What's inside
- Which Mount Type Fits Your Kitchen Layout
- Spec Comparison: Capacity, Size, and Materials That Matter
- Decision Matrix: Pick by Your Situation
- Load and Clearance Calculation Before You Drill
- Material and Finish: What Holds Up in a Small Kitchen
- Installation and Ownership Realities
- Space-Saving Setup by Kitchen Size
- FAQ
- Which Mount Type Fits Your Kitchen Layout
- Spec Comparison: Capacity, Size, and Materials That Matter
- Decision Matrix: Pick by Your Situation
- Load and Clearance Calculation Before You Drill
- Material and Finish: What Holds Up in a Small Kitchen
- Installation and Ownership Realities
- Space-Saving Setup by Kitchen Size
- FAQ
As an Amazon Associate I earn from qualifying purchases. This post may contain affiliate links at no extra cost to you.
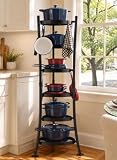
The best pot racks for small kitchens are ceiling-mounted oval racks for islands and low-clearance ceilings, and wall-mounted bar or tiered racks for galley and L-shaped layouts without island space, with Enclume and Cooks Standard offering the most durable steel options for daily use.
As an Amazon Associate we earn from qualifying purchases at no extra cost to you.


Contents
- Which Mount Type Fits Your Kitchen Layout
- Spec Comparison: Capacity, Size, and Materials That Matter
- Decision Matrix: Pick by Your Situation
- Load and Clearance Calculation Before You Drill
- Material and Finish: What Holds Up in a Small Kitchen
- Installation and Ownership Realities
- Space-Saving Setup by Kitchen Size
- FAQ
Which Mount Type Fits Your Kitchen Layout
Choosing by mount type first saves you from buying a rack you can’t safely install. Small kitchens rarely have the joist access and clearance for any style, so match the rack to your footprint.
Ceiling-Mounted Racks: Best for Islands and Peninsulas
Ceiling racks use vertical space you otherwise waste and keep heavy cast iron accessible without sacrificing cabinet space. They require a ceiling joist or solid wood blocking, minimum 7-foot ceilings for comfortable clearance, and at least 30 inches of horizontal space. In small kitchens with an island or peninsula of 36 inches or longer, a 30 to 36-inch oval or rectangular ceiling rack centers over the island and creates a defined cooking zone.
- Needs two joists or a ceiling joist plus blocking; drywall anchors alone will fail under load.
- Ideal when you cook 4+ times per week and own 6 or more heavy pans.
- Leave 36 to 42 inches from the bottom of the rack to the countertop so you don’t hit your head and still reach pots easily.
Wall-Mounted Racks: Best for Galley, L-Shaped, and No-Island Kitchens
Wall racks mount like heavy-duty shelving and are the safest option for apartments, rentals with concrete ceilings, or kitchens under 100 square feet. A single wall stud can support more weight than a drywall ceiling anchor, and installation is faster with fewer height calculations. Look for 30 to 36-inch single-tier bars or half-round grid racks that hold 6 to 8 pieces without protruding more than 12 inches from the wall.
- Requires at least one wall stud; use a stud finder and 3/16-inch lag bolts with washers.
- Best when floor space is tight and you need to keep sightlines open.
- Mount 20 to 24 inches above your backsplash or countertop to prevent steam damage to drywall.
Island-Style Hanging Racks vs. Standing Island Racks
Don’t confuse a ceiling rack hung over an island with a freestanding island pot rack. Freestanding racks with a base that sits on the island countertop exist but eat valuable prep space and are unstable for cast iron in small kitchens. For small islands under 48 inches long, a wall rack on the nearest wall is more space-efficient than any island-top solution.
Spec Comparison: Capacity, Size, and Materials That Matter
Load capacity is the spec that actually prevents failure. Most listings round up. Focus on the rack’s own weight plus its rated load, and compare that to your cookware’s total weight.
| Rack Type / Example | Dimensions (L x W x H) | Rack Weight | Rated Load Capacity | Material / Finish | Mount Hardware Included |
|---|---|---|---|---|---|
| Ceiling Oval – Enclume Classic Oval | 36 x 18 x 17 in | 18 lbs | 80 lbs | Hammered steel, chrome or brass | 2 chains, ceiling hooks, lag bolts |
| Ceiling Rectangular – Enclume Handcrafted Rectangular | 30 x 18 x 18 in | 15 lbs | 60 lbs | Powder-coated steel, matte black | 4 chains, S-hooks, lag bolts |
| Wall Bar – Cuisinart Chef’s Classic Wall Rack | 36 x 8 x 10 in | 7 lbs | 40 lbs | Stainless steel, brushed finish | Wall brackets, lag bolts, S-hooks (12) |
| Wall Tiered – Cooks Standard Single-Tier Wall Mount | 36 x 12 x 14 in | 11 lbs | 50 lbs | Stainless steel, chrome grid | Wall brackets, anchors, S-hooks (10) |
| Wall Half-Round – Old Dutch Wall Pot Rack | 30 x 13 x 16 in | 9 lbs | 35 lbs | Wrought iron, matte black | Wall brackets, lag bolts, S-hooks (8) |
For reference, a single 12-inch cast iron skillet weighs 7 to 8 lbs, a 6-quart enameled Dutch oven weighs 13 to 15 lbs empty, and a 10-piece stainless steel set totals 30 to 42 lbs with lids. If you hang four cast iron pieces and two saucepans, you are already at 35 to 45 lbs before adding chains and hooks.
Decision Matrix: Pick by Your Situation
Use your layout, ceiling height, and cookware weight to narrow to one category first, then choose finish.
| Your Situation | Best Mount Type | Why It Works | Finish to Choose |
|---|---|---|---|
| Small kitchen with island, 8 ft+ ceiling, 6+ heavy pans | 36-inch Ceiling Oval | Even weight distribution across two joists, holds Dutch ovens without wall crowding | Hammered steel or powder-coated steel resists chipping from heavy hooks |
| Galley kitchen, no island, rental-friendly install | 36-inch Wall Bar | Single-stud installation, shallow 8-inch projection keeps walkway clear | Brushed stainless steel wipes clean and matches appliances |
| L-shaped kitchen, low 7 ft ceiling, light stainless cookware | 30-inch Wall Tiered Grid | More hooks per linear foot, no head-bump risk | Chrome or stainless for steam resistance |
| Budget under $150, mostly aluminum/nonstick | 30-inch Wall Half-Round | Lower capacity is sufficient for lighter pans, lowest install cost | Powder-coated or wrought iron to hide minor scratches |
| Owns 3+ cast iron pieces over 10 lbs each | Ceiling Rectangular with 4-point chain | Four chains cut sway and spread load to two joists | Uncoated or hammered steel rated to 60+ lbs |
Load and Clearance Calculation Before You Drill
Do this 5-minute math before buying. It prevents sagging ceilings and failed anchors, the two most common returns.
Step 1: Weigh your real load. Hang your pots on a bathroom scale one by one and add them up. Example: 2 cast iron skillets (8 lbs x 2 = 16 lbs) + 1 Dutch oven (14 lbs) + 3 stainless saucepans with lids (5 lbs x 3 = 15 lbs) = 45 lbs of cookware.
Step 2: Add rack and hardware. A typical 36-inch steel rack is 15 to 18 lbs, plus 2 to 3 lbs for S-hooks and chains. Total suspended weight = 45 + 18 + 3 = 66 lbs.
Step 3: Check hardware shear strength. Two 3/8-inch x 3-inch lag bolts into a solid ceiling joist have a combined shear strength of 400+ lbs, which safely supports 66 lbs. Two drywall toggle bolts are typically rated to 40 to 60 lbs total in 1/2-inch drywall, which fails under the same load and will pull out over time. If you cannot hit at least one joist, choose a wall rack instead.
Step 4: Check clearance. Measure ceiling to countertop height, subtract rack height and chain length, and ensure at least 36 inches remain. Example: 96-inch ceiling minus 18-inch chain/rack assembly minus 36-inch clearance = 42 inches to countertop. In a 84-inch (7-foot) ceiling kitchen, that same assembly leaves only 30 inches, which is too low, so you need a wall mount or shorter 12-inch chains.
Material and Finish: What Holds Up in a Small Kitchen
Small kitchens expose racks to more steam, grease, and bumping. Finish affects cleaning time as much as looks.
- Powder-coated steel (matte black, white): Most durable against scratches from sliding S-hooks. Resists rust in humid kitchens. Touch-up paint is inexpensive if chipped. Best for daily-use ceiling racks.
- Hammered steel (Enclume style): Thick gauge steel that hides dents and develops a patina. Heavy, so verify joist support, but lasts decades. Ideal if you hang cast iron.
- Brushed stainless steel: Non-porous and easiest to degrease. Shows fingerprints but won’t flake. Best for wall racks near stovetops where grease splatter is constant.
- Chrome-plated grid: Bright and rust-resistant if plating is intact. Once chipped, it can rust at the chip, especially near a kettle or dishwasher steam. Inspect welds annually.
- Wrought iron: Strong but often lighter gauge than it looks. Check rated capacity closely. Requires oiling if finish wears through in coastal or very humid climates.
Avoid wooden racks with metal cores in small, humid kitchens unless the wood is sealed and you can re-oil it. Steam will crack unsealed wood within one to two years above a stove.
Installation and Ownership Realities
Easy installation depends on stud and joist access, not the number of parts. Plan for these realities.
- What wears first: S-hooks stretch and chain links oval under heavy cast iron before the rack itself bends. Replace standard stamped S-hooks with welded closed hooks rated to 15 lbs each if you hang Dutch ovens. Chains elongate 1 to 2 mm per year under constant 50+ lb loads and should be inspected yearly.
- Consumables: You will buy extra S-hooks, pot lid organizers, and ceiling hook covers. Budget $15 to $30 for a pack of heavier hooks. Keep two spare lag bolts and washers if you ever relocate the rack.
- Cleaning: Grease builds heaviest on the top bar. Wipe powder-coated and stainless racks monthly with hot soapy water, not abrasive pads that strip finish. For hammered steel, a damp cloth followed by a dry cloth prevents water spots.
- Common mistakes: Hanging pots by handle holes instead of S-hooks causes swinging and handle wear; using adhesive hooks for a 35-lb load; centering the rack on a light fixture instead of joists; and hanging a rack so low that you block vent hood airflow. Keep at least 12 inches clear on either side of a range hood vent.
- Rental alternative: If you cannot drill into joists, a wall-mounted rack with one stud plus heavy-duty drywall anchors for the second bracket is safer than a ceiling rack with only drywall support. Use a French cleat wall rack and add a safety cable to the stud side for extra security.
Space-Saving Setup by Kitchen Size
For kitchens under 80 square feet, hang only daily-use pans on the rack and store stockpots and specialty pieces in a cabinet. A rack with 10 hooks holding 6 pans looks functional; a rack overloaded with 10 pans feels cluttered and exceeds capacity. Stagger heights by 2 to 3 inches using different S-hook lengths so pans nest without clanking.
For narrow galleys under 5 feet wide, mount the wall rack on the side with less foot traffic and keep the opposite wall clear for opening oven and dishwasher doors. In 2026 market ranges, quality wall racks typically run $60 to $160 and ceiling racks $120 to $350 depending on size and steel gauge, with installation hardware included but ceiling blocking or professional install adding $75 to $200 if you hire out.
FAQ
Can I install a ceiling pot rack in a drywall ceiling without a joist?
No. Drywall alone cannot support a loaded pot rack long-term, even with toggle bolts. You need at least one joist, or solid wood blocking installed between joists. If you cannot locate joists with a stud finder, use a wall-mounted rack instead.
How much weight can my ceiling joist hold for a pot rack?
A single standard 2×8 ceiling joist can easily support a 60 to 80 lb static load from a pot rack when using proper 3/8-inch lag bolts, but the limiting factor is pull-out strength of the hardware and whether you hit the center of the joist. Always drill a pilot hole and use the lag bolts supplied or upgrade to 3/8-inch diameter.
Will a pot rack make a small kitchen look smaller?
A wall rack mounted above counter height keeps the room open, while a ceiling rack over an island defines the space without shrinking it if you keep 36+ inches of clearance below it. Overloading any rack with too many pans creates visual clutter, so limit it to 6 to 8 pieces you use weekly.