What's inside
- Quick picks by situation
- What to look for in the best wood burning kits
- Head-to-head: beginner irons versus controlled pyrography systems
- Decision matrix: which kit matches your workshop?
- How included materials change the value
- Handle comfort, storage, and workspace details
- Setup and maintenance for cleaner results
- Are expensive wood burning kits worth it?
- Frequently asked questions
- Quick picks by situation
- What to look for in the best wood burning kits
- Head-to-head: beginner irons versus controlled pyrography systems
- Decision matrix: which kit matches your workshop?
- How included materials change the value
- Handle comfort, storage, and workspace details
- Setup and maintenance for cleaner results
- Are expensive wood burning kits worth it?
- Frequently asked questions
As an Amazon Associate I earn from qualifying purchases. This post may contain affiliate links at no extra cost to you.
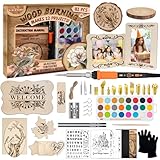
The best wood burning kits depend on your project: choose a low-cost single-pen kit for learning, a temperature-controlled dual-pen system for detailed pyrography, or a higher-powered burner with interchangeable tips for larger and harder wood projects.
As an Amazon Associate we earn from qualifying purchases at no extra cost to you.



Contents
- Quick picks by situation
- What to look for in the best wood burning kits
- Head-to-head: beginner irons versus controlled pyrography systems
- Decision matrix: which kit matches your workshop?
- How included materials change the value
- Handle comfort, storage, and workspace details
- Setup and maintenance for cleaner results
- Are expensive wood burning kits worth it?
- Frequently asked questions
Quick picks by situation
| Best for | Recommended type or kit | Typical temperature or power | Why it fits | Typical market range |
|---|---|---|---|---|
| First-time users and occasional gifts | Walnut Hollow Creative Versa-Tool | 15–30 W; adjustable heat | Simple controls, broad tip selection, easy entry price | $35–$60 |
| Detailed pyrography and frequent use | TRUArt Stage 2 Dual-Pen | About 60 W; adjustable to approximately 900°F | Two pens reduce tip changes and improve control during shading | $180–$260 |
| Professional-level detail work | Colwood Detailer | Temperature-controlled solid-point system | Stable heat, replaceable pen tips, strong accessory ecosystem | $200–$350 before large accessory bundles |
| Heavier marks and larger surfaces | High-powered variable-temperature burner | 60–100 W; roughly 750–1,000°F maximum | Recovers heat faster and handles broad shading or harder woods better | $150–$350 |
What to look for in the best wood burning kits
Temperature control matters more than a high maximum temperature. A burner that adjusts smoothly lets you make pale guide lines, dark outlines, gradual shading, and deep texture without changing tools. Fixed-temperature craft irons can work for simple signs, but they make delicate transitions harder and may scorch soft wood quickly.
Tip variety is the next major difference. A beginner kit usually includes universal points, a knife or spear point, a shading point, and a few lettering tips. A serious pyrography kit may use replaceable solid brass or wire-style tips designed for specific strokes. Broad shaders cover large areas, skew tips make clean curves, and small writing tips handle lettering. More tips are useful only if they are shaped for your work; a box of poorly organized duplicates is less valuable than six good, distinct profiles.
Heat-up time is usually between 30 seconds and several minutes. Solid-point irons often take longer to reach working temperature, while wire-nib systems can heat in roughly 5–15 seconds. Fast heat-up is convenient, but temperature recovery during a long stroke is more important. A low-powered iron may feel hot at rest yet cool noticeably when dragged across dense wood.
Head-to-head: beginner irons versus controlled pyrography systems
Beginner craft kits
Entry-level kits such as the Walnut Hollow Creative Versa-Tool are suited to names, simple patterns, decorative boxes, coasters, and occasional gifts. Their familiar pencil-like handles and inexpensive replacement tips make them approachable. Many packages also include a stand, carrying case, or small project materials.
The trade-off is precision. The handle can become warm during extended sessions, the tip selection is often oriented toward craft lettering rather than fine tonal work, and temperature adjustment may be less refined than on a dedicated pyrography power supply. These kits are a sensible purchase when you expect to burn a few projects per year and want to keep the total cost moderate.
Dual-pen and professional systems
The TRUArt Stage 2 Dual-Pen and Colwood Detailer occupy a different category. A dual-pen station allows one pen to hold a fine writing tip while the other holds a shader, reducing interruptions and preventing repeated tip changes. Colwood’s system is valued for interchangeable pen assemblies and consistent heat control, particularly when an artist spends hours building smooth gradients.
These systems usually have better-balanced handpieces, more useful temperature adjustment, and faster recovery than basic craft irons. They also cost more and require a dedicated work area. If you burn once every few months, the extra capability may sit unused; if you produce portraits, lettering commissions, or batches of ornaments, it can pay for itself in saved setup time.
Decision matrix: which kit matches your workshop?
| Your situation | Prioritize | Best match | What to avoid |
|---|---|---|---|
| Budget under $75 | Adjustable heat, safe stand, replaceable tips | Single-pen variable-temperature craft kit | Large bundles with many duplicate tips |
| Small apartment or shared table | Compact controller, stable stand, short storage case | One-pen kit with a 15–30 W controller | Bulky dual-pen stations without enclosed storage |
| Weekly detailed work | Fine temperature control, cool handle, quick recovery | Dual-pen or professional solid-point system | Fixed-temperature irons |
| Large signs or hard maple | 60 W or more, broad shaders, heat recovery | High-powered variable-temperature burner | Small 15 W lettering irons used for large filled areas |
| Gift for a complete beginner | Project blanks, pattern sheets, stand, instructions | Organized starter bundle | Professional station with no materials or guidance |
How included materials change the value
Project materials can make a beginner kit much more useful on day one. Look for basswood or other light, untreated blanks, graphite paper, pattern sheets, and a stable tool rest. Basswood is forgiving because its fine grain accepts both light lines and darker shading. Plywood, pressure-treated lumber, painted boards, and unknown reclaimed wood are poor starting materials: glue lines and coatings burn unevenly, and some finishes can release unpleasant fumes.
Calculate the practical value rather than counting every accessory. Suppose a kit costs $50 and includes three usable basswood blanks that would otherwise cost about $4 each. Its effective tool cost is approximately $38 before consumables:
$50 − (3 × $4) = $38.
That calculation does not make a cheap kit automatically better, but it explains why a smaller, well-chosen bundle can beat a larger package filled with low-value accessories.
Handle comfort, storage, and workspace details
A comfortable handle should allow a relaxed pencil grip without forcing your fingers close to the hot ferrule. Rubberized or contoured grips can reduce fatigue, but excessive softness may make precise rotation more difficult. Check whether the pen rests securely in the included stand and whether the power cord exits the rear without pulling across the work.
Storage cases are more important than they appear. A useful case separates hot tips from cords, protects delicate points from bending, and leaves room for replacement nibs. Plastic molded cases are convenient for beginners, while a professional system may arrive with a soft case or require a separate tool organizer. Never put a hot pen into a closed case; allow it to cool fully on a nonflammable stand first.
Setup and maintenance for cleaner results
- Prepare the wood. Sand with progressively finer paper, commonly ending around 220 grit, and remove dust. A smooth surface reduces snagging and makes light strokes easier to control.
- Test the temperature. Use a scrap of the same wood. Increase heat gradually until the tip leaves a controlled brown line rather than a deep black trench.
- Warm the tool on its stand. Keep the tip away from paper, cloth, and shavings while it reaches temperature.
- Use the correct tip. A writing point is for lines; a shader is for broad tone; a knife or skew point is for edges and texture. Do not force a small tip to fill a large area.
- Clean after cooling. Remove residue with a suitable brass-bristle tip cleaner or the manufacturer’s recommended method. Avoid aggressive filing, which can change the tip’s shape.
- Inspect consumables. Replace bent, cracked, or heavily pitted tips. Damaged tips transfer heat unpredictably and encourage excess pressure.
Most beginners make dark marks by pressing harder instead of adjusting heat, slowing the stroke, or making several light passes. Pressure can catch grain and produce a jagged line. Let the temperature do the work, and keep the pen moving at a consistent speed.
Are expensive wood burning kits worth it?
For occasional names, ornaments, and simple signs, an adjustable 15–30 W kit is usually enough. Spend more when you need repeatable shading, rapid tip changes, long-session comfort, or reliable heat on dense wood. The upgrade is most noticeable in temperature stability and handpiece ergonomics, not merely in the number printed on the box.
For a first purchase, select the kit that matches your expected frequency of use, then reserve part of the budget for quality basswood blanks, a heat-resistant work surface, and replacement tips. The best wood burning kits are not the ones with the longest accessory list; they are the ones whose heat range, tip shapes, handle, and storage solution suit the marks you actually plan to make.
Frequently asked questions
What temperature should a beginner use?
Start at a low-to-middle setting and test on scrap wood. There is no universal temperature because species, moisture, tip shape, and stroke speed all change the result. Light lines should be built gradually rather than forced with maximum heat.
Can a wood burning kit work on any wood?
Use clean, dry, untreated wood. Avoid pressure-treated, painted, varnished, laminated, or unknown reclaimed boards unless you have confirmed that they are safe to heat and work in well-ventilated conditions.
Do I need two pens?
No. One pen is sufficient for learning and many finished pieces. Two pens become valuable when you alternate frequently between a fine line and a shader, or when changing tips would interrupt a production workflow.