What's inside
- Wood Engraving Ideas for Beginners: Easy Projects to Start With
- Choose a project that matches your tool and workspace
- Four forgiving projects to try
- Set up for clean, low-risk practice
- A simple workflow from sketch to finish
- What tends to go wrong—and how to avoid wasting a blank
- Which project should you start with?
- Related Guides
- Wood Engraving Ideas for Beginners: Easy Projects to Start With
- Choose a project that matches your tool and workspace
- Four forgiving projects to try
- Set up for clean, low-risk practice
- A simple workflow from sketch to finish
- What tends to go wrong—and how to avoid wasting a blank
- Which project should you start with?
- Related Guides
As an Amazon Associate I earn from qualifying purchases. This post may contain affiliate links at no extra cost to you.
Contents
- Wood Engraving Ideas for Beginners: Easy Projects to Start With
- Choose a project that matches your tool and workspace
- Four forgiving projects to try
- Set up for clean, low-risk practice
- A simple workflow from sketch to finish
- What tends to go wrong—and how to avoid wasting a blank
- Which project should you start with?
- Related Guides
Wood Engraving Ideas for Beginners: Easy Projects to Start With
Start with a 100 × 150 mm (4 × 6 in) plaque of soft basswood and engrave a short name, simple leaf, or geometric border: each offers wide, uncluttered lines that are easy to guide and forgiving to sand if your first passes are uneven.
Choose a project that matches your tool and workspace
“Wood engraving” can mean several things: drawing with a heated wood-burning pen, cutting lines with a rotary tool, or carving with hand tools. The projects below suit all three methods, but the settings differ. A wood-burning pen darkens the surface; a rotary tool removes material; a carving tool cuts a groove. Use the tool’s manual for its recommended settings, bits, and safety precautions rather than assuming one setting fits every tool.
As an Amazon Associate we earn from qualifying purchases at no extra cost to you.
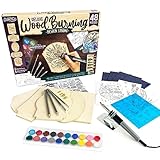



| Project | Suggested blank | Beginner path | Why it works |
|---|---|---|---|
| Name plaque | 100 × 150 × 12 mm (4 × 6 × ½ in), basswood | Letters made from straight strokes; add a single-line border | Large lettering leaves room to steady your hand |
| Wooden coaster | 90–100 mm (3½–4 in) diameter, 8–10 mm (⅜ in) thick | One central icon inside a circle | Small design limits practice time and material use |
| Gift tag | 40 × 80 × 6 mm (1½ × 3 × ¼ in), basswood | Initial and one simple motif | Useful for testing a design before a larger piece |
| Practice tile | 75 × 100 × 6 mm (3 × 4 × ¼ in), scrap basswood | Parallel lines, curves, and dots | Lets you tune the technique before making a gift |
Four forgiving projects to try
1. A single-name plaque
Transfer a name in block capitals using a pencil or a paper template. Keep the letters at least 15 mm (⅝ in) tall for a first attempt, and leave roughly 5 mm (⅕ in) between strokes so they do not run together. Engrave the letter outlines first, then fill or darken them only if the tool and design call for it. A simple rectangular border is easier to control than ornate lettering.
2. A one-icon coaster
Choose an icon with a clear silhouette—such as a leaf, star, or mountain outline—and keep it to about 50 mm (2 in) across. Draw a circle lightly as a placement guide. Follow the outline in short, steady sections, turning the blank as needed instead of twisting your wrist into awkward angles. Avoid detailed shading until you can make consistent lines.
3. A gift tag with an initial
On a 40 × 80 mm (1½ × 3 in) blank, center one large initial and add a hole only if you can drill it securely before engraving. Keep the design away from the hole and edges, where narrow areas can split or become difficult to hold. This is a practical place to try a new font or test how a finish affects the color.
4. A line-and-dot practice tile
Before working on a finished object, draw three straight lines, three broad curves, and a row of dots on scrap. Make a second set with lighter pressure or a quicker pass, if appropriate for your tool. Compare the marks and choose the technique that gives the cleanest line without forcing the tool. For heated pens, begin with the manufacturer’s recommended setting for the tip and wood; let the tool heat and cool as instructed. For rotary tools, start at a conservative speed recommended for the bit and practice on scrap, keeping the workpiece clamped.
Set up for clean, low-risk practice
- Pick suitable wood. Basswood is commonly used for beginner carving and burning because it is relatively soft and usually has an even grain. Avoid painted, stained, pressure-treated, or unknown reclaimed wood, particularly with heated tools, since coatings and treatments can produce hazardous fumes. Work only with clean, untreated stock.
- Secure the blank. Use a clamp or bench hook so the piece cannot shift. Keep fingers clear of the tool path, and do not hold a small blank in your palm while cutting or engraving.
- Prepare the surface. Sand the face smooth with 180- to 220-grit sandpaper, following the grain. Remove dust before transferring the design; pencil lines and uneven grain can otherwise make the finished mark harder to read.
- Use a clear workspace. Keep the cord, hot pen stand, and loose materials away from the cutting area. With power tools, wear eye protection and follow the tool maker’s dust and hearing protection guidance. For burning, ventilate the area, keep the hot tip on its stand when not in use, and let it cool fully before changing tips or storing it.
- Practice the exact design. Use a scrap piece of the same wood when possible. Grain, hardness, and surface preparation affect how marks look, so a practice line on a different material may not predict the final result.
A simple workflow from sketch to finish
- Make the design larger than you think you need. Simplify it to an outline and a few strokes. Fine details are difficult to control and may disappear under a finish.
- Transfer it lightly. Use a template or faint pencil marks; heavy pencil grooves can remain visible after engraving.
- Test on scrap. Check line width and darkness or depth. Change only one variable at a time—such as speed, pressure, or heat setting—so you can tell what improved the result.
- Engrave the main lines first. Work from the center outward where practical, rotating the blank for a comfortable approach. Use light, controlled passes rather than trying to make a deep groove in one go.
- Clean up cautiously. Brush away dust. If a mark needs light sanding, use fine paper carefully; sanding across a burned or cut line can blur it. Do not handle or sand a heated-tool project until it has cooled.
- Apply a suitable finish. For a decorative indoor plaque, a thin coat of a compatible clear finish can protect the surface; follow its label and let it dry fully. Test the finish on scrap first because it can darken wood and change the contrast. Keep food-contact items, such as coasters, to finishes explicitly labeled for the intended use, and follow those directions.
What tends to go wrong—and how to avoid wasting a blank
Uneven lines commonly come from moving too quickly, pressing too hard, or fighting the grain. Slow down, support your hand on the bench rather than the work, and turn the piece to keep the tool’s path comfortable. If a line starts to wander, stop and lift the tool instead of trying to correct it with a sudden sideways motion.
Tool tips, bits, and abrasives are consumables. Tips can collect residue, rotary bits can wear or clog, and sandpaper loses its bite. Clean or replace them as the manufacturer directs; a dirty or worn tip can make a practice setting seem unreliable. Store sharp bits and carving tools securely, and unplug power tools before changing accessories. Beginners usually get more value from a small selection of appropriate, sharp accessories than from a large set they cannot identify or control.
Which project should you start with?
| Your situation | Good first choice | Reason |
|---|---|---|
| New to engraving and want low material waste | 75 × 100 mm practice tile | Short exercises reveal control problems before you commit to a finished design |
| Making a quick personalized gift | 40 × 80 mm tag | A single initial or icon suits the small surface |
| Want a useful object with a simple layout | 90–100 mm coaster | A central motif is easy to position and keeps the line path compact |
| Want to practice lettering | 100 × 150 mm plaque | Larger letters are easier to follow and refine |
If you are unsure which tool technique to learn first, make the practice tile with the tool you already own and follow its manual. Keep the first finished design to one clear outline, work on scrap before the final blank, and let the wood—not pressure—set the pace.