What's inside
As an Amazon Associate I earn from qualifying purchases. This post may contain affiliate links at no extra cost to you.
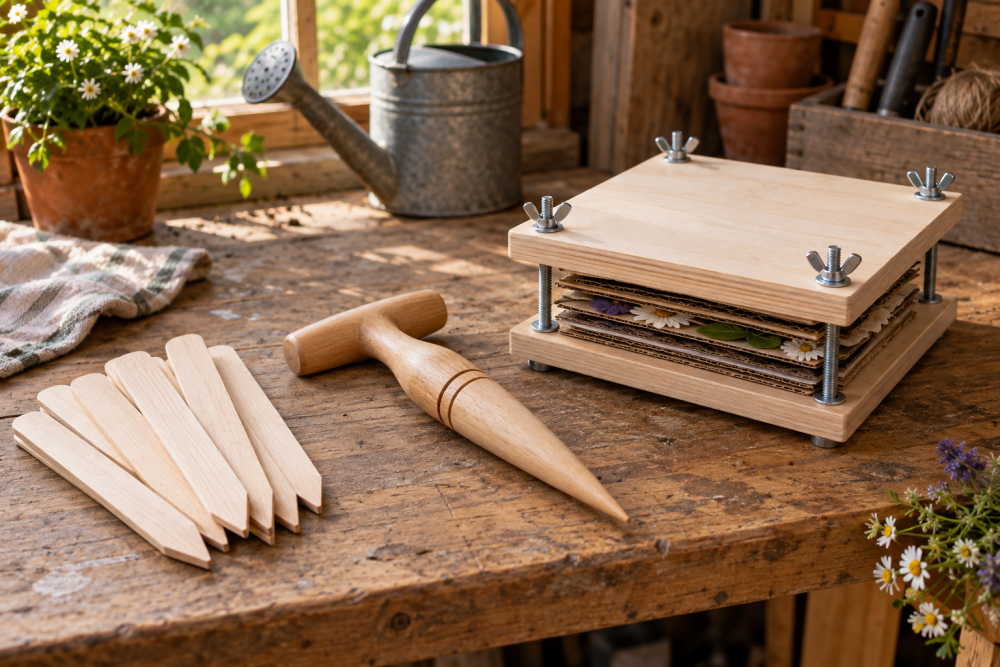
A wooden leaf press is a small, forgiving weekend project: two flat boards, a stack of absorbent sheets, and a few fasteners to apply pressure. The useful part is not making it elaborate. It is making the boards flat, choosing paper that can handle damp leaves, and tightening the press evenly enough to avoid curled specimens.
Contents
Plan the weekend
Set aside about three to five hours of shop time, plus drying time for any finish. A practical press for leaves and small flowers has boards about 12 by 12 inches, with four bolts near the corners. That size fits common printer paper cut to 10 by 10 inches and is easy to store. For larger leaves, make the boards 12 by 16 inches and use matching paper; the bigger press costs more and needs more even tightening.
On Saturday, cut and sand the boards, drill the holes, and assemble a test stack. On Sunday, check the fit, seal the wood if desired, and press a small batch. You can use the press immediately if the boards are unfinished and dry. If you apply oil or another finish, follow its cure instructions before putting paper and plants inside.
Materials and buying choices
Use two pieces of 3/4-inch plywood or solid wood. Plywood is stable and usually cheaper; choose a flat, void-free piece rather than the lowest-grade scrap, which may have rough edges or hollow spots. A hardwood offcut is attractive but not necessary. Avoid thin boards that bow under pressure.
For a first press, buy four 1/4-inch carriage bolts, four washers, and four wing nuts, with bolts long enough to pass through both boards and the full stack. A 4-inch bolt often works for a modest stack; measure your intended stack before buying. Washers spread the load and help keep the nuts from digging into the wood. A carriage-bolt and wing-nut set is convenient, though a local hardware store is fine if you want to select the length individually.
Use absorbent paper between leaves. Plain newsprint or unprinted blotting paper is preferable to glossy paper, which absorbs poorly. Printer paper is acceptable for small, thin leaves, but it holds less moisture and may need changing more often. Keep a supply of cardboard or corrugated board as stiff separators.
| Choice | Good for | Trade-off |
|---|---|---|
| 3/4-inch plywood | A low-cost, stable press | Edges need sanding; cheap sheets can have voids |
| Hardwood boards | A durable press with a finished look | Costs more and may move with humidity |
| Printer paper | Occasional use with small, thin leaves | Less absorbent; change it more often |
| Blotting paper | Frequent pressing or damp specimens | Higher paper cost |
Cut and drill the boards
Mark two equal squares, around 12 by 12 inches. Cut them with a circular saw and a straightedge, or have the lumber yard make the cuts. Check the pieces against each other; a rough mismatch can leave the stack uneven. Sand the faces and edges with 120-grit paper, then smooth sharp corners with a few passes. The boards do not need furniture-grade sanding, but splinters can snag paper and leaves.
Mark a hole center 1 inch in from each corner. Clamp the boards together and drill through both at once with a 5/16-inch bit for 1/4-inch bolts. This slight clearance makes assembly easier. Put scrap wood beneath the stack to limit tear-out. If you do not have a drill press, keep the drill perpendicular by sighting from two directions; angled holes can make the bolts bind. Separate the boards and clear away sawdust.
Test each bolt in its hole before assembly. If a carriage-bolt shoulder will not seat, gently square the top of the hole with a file or chisel, or use regular machine bolts instead. Do not force a bolt through and split the board.
Assemble and load the press
Put the lower board on a flat surface. Make a stack from alternating layers of cardboard and absorbent paper, with each leaf laid flat between sheets. Keep plant material away from the bolt holes. Close with the upper board, add washers and wing nuts, and tighten in a diagonal pattern: one corner, then the opposite corner. Repeat until the boards are snug and parallel.
Do not crank one nut all the way down while the others are loose. That tilts the top board and can wrinkle the contents. Tighten by hand; excessive force can crush thick stems, buckle a board, or make a leaf stick to wet paper. For especially thick leaves, remove some layers from the press rather than trying to compensate with more torque.
Use it during fall
Collect sound leaves that are dry on the surface, ideally soon after they fall. Wet leaves can stain surrounding paper and encourage mold. Flatten curled specimens gently before loading, and avoid leaves with thick, fleshy stems if you want a quick result. Change the paper after the first day if it feels damp. Thin leaves may be ready in several days; thicker ones can take one to two weeks, depending on humidity and how often the paper is changed.
Open the press carefully to check progress. If leaves still feel cool or pliable, replace damp sheets and tighten the stack evenly again. A musty smell or visible spotting means the stack stayed too wet: remove affected specimens, discard damp paper, and let the boards and remaining materials dry fully before reloading. Do not seal a damp leaf inside a craft project.
Finish and storage
Unfinished wood is perfectly adequate and avoids finish contacting specimens. If you want easier cleanup, apply a thin coat of clear finish to the outside faces only, keeping the inner faces uncoated. Let it cure completely; fresh finish can transfer odor to paper. Store the press flat in a dry place with the wing nuts loosened slightly. Keeping it tightened under no load can leave the boards under unnecessary stress.
If the boards begin to bow, inspect them on a flat surface and reduce the stack height. A press does not need to be heavy to work: flat boards and even pressure matter more than force. For occasional fall collecting, a simple plywood version and printer paper are enough. Spend more on better paper or larger boards only when your specimens or pressing volume make the difference useful.