What's inside
As an Amazon Associate I earn from qualifying purchases. This post may contain affiliate links at no extra cost to you.
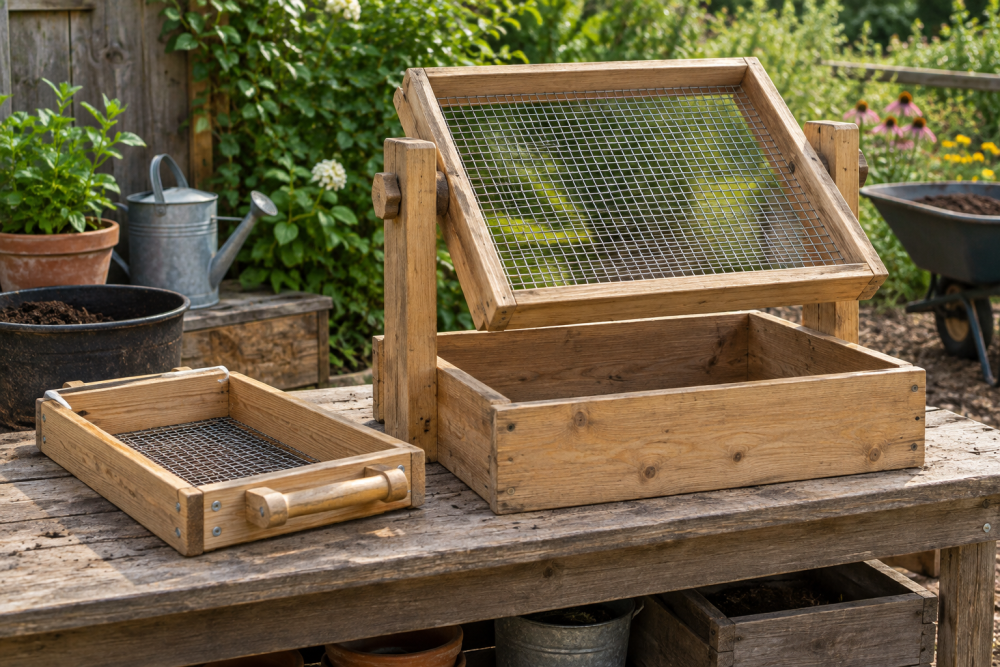
A compact compost sifter turns half-finished compost, leaf mold, and old potting mix into a more useful material. This version uses a shallow wood frame mounted on pivots, so you can rock it over a wheelbarrow instead of lifting and shaking a heavy screen. It is a good weekend project for a beginner with basic saw and drill skills, and it stores against a wall when the gardening season ends.
Contents
What You’re Building
The sifter is a 24-by-36-inch rectangular frame holding hardware cloth. Two bolts act as pivots near the frame’s long sides. A separate support stand holds the pivots above a wheelbarrow or garden cart. You load a few shovelfuls of compost, rock the frame back and forth, and remove the woody pieces left on top.
A 1/2-inch screen is the best general-purpose choice. It lets fine compost through while catching most sticks, stones, clumps, and uncomposted stems. Use 1/4-inch mesh for seed-starting mix or very fine potting material, but expect slower sifting and more clogging.
| Screen opening | Best use | Trade-off |
|---|---|---|
| 1/4 inch | Seed mix and fine top dressing | Cleaner material, but slow and prone to clogging |
| 1/2 inch | General compost and garden beds | Best balance of speed and texture |
| 3/4 inch | Rough screening and large batches | Fast, but more twigs and coarse material pass through |
Materials and Tools
- Two 1-by-4 boards, 36 inches long
- Two 1-by-4 boards, 23 inches long
- 24-by-36-inch piece of 1/2-inch galvanized hardware cloth
- Four 2-by-4 boards for the support stand, each 30 inches long
- Two 3/8-by-5-inch carriage bolts, with washers and wing nuts
- 1-1/4-inch exterior screws
- 3/8-inch staples or fencing staples
- Exterior wood glue
- Drill, 3/8-inch bit, driver, tape measure, square, tin snips, and a staple gun
For the screen, 1/2-inch galvanized hardware cloth is usually the practical buy. Chicken wire is cheaper but has flexible hexagonal openings that allow long sticks to hang up and deform the screen. If your local hardware store sells it by the foot, that is often less expensive than buying a full roll.
Straight, dry construction lumber is fine. Avoid boards with large knots where the pivot holes will go. If the stand will live outdoors, use treated lumber or coat all cut ends with exterior wood preservative.
Build the Sifting Frame
Cut the long boards to 36 inches and the end boards to 23 inches. This creates an outside frame close to 24 by 36 inches when the 1-by-4 boards are assembled. Check the actual width of your lumber before cutting; nominal 1-by-4 boards are usually about 3-1/2 inches wide, and the exact dimensions are not critical.
Lay the boards flat, forming a rectangle. Apply glue at the joints, then drive two 1-1/4-inch exterior screws through each end board into the long board. Measure diagonally from corner to corner. Adjust the frame until both diagonal measurements match before tightening the screws. A square frame pivots smoothly; a twisted one binds against the stand.
Cut the hardware cloth to roughly 25 by 37 inches with tin snips, leaving an inch of overlap on every side. Wear gloves because cut wire is extremely sharp. Lay the screen over the back of the frame and staple it every 3 to 4 inches around the perimeter. Pull it tight as you work, but do not stretch it so hard that the openings distort.
Fold or bend the sharp screen edge down against the wood. For a more durable edge, cover the perimeter with thin wood strips screwed over the hardware cloth. This takes longer but prevents loose wire from catching gloves and makes replacement easier later.
Add the Pivoting Hardware
On each long side, mark a pivot center 9 inches from one end and halfway up the 3-1/2-inch board. Drill a 3/8-inch hole through the frame at each mark. The holes must line up closely from side to side. Measure from the same end rather than guessing.
Insert a carriage bolt from the outside of each long side. Add a washer and wing nut, but leave the nut loose enough for the frame to rotate. If the bolt head spins while tightening, tap the square shoulder into the wood or use a wrench on the nut while holding the head with pliers.
Make the Support Stand
Build two simple A-shaped supports, one at each end of the sifter. For each support, place two 30-inch 2-by-4 legs at an angle so their feet sit about 22 inches apart. Connect the legs with a 20-inch crosspiece positioned 12 inches above the ground. Drive two screws through each joint.
Set the supports about 34 inches apart, leaving enough room for the 36-inch frame to sit between them without rubbing. Drill a 3/8-inch pivot hole through each pair of legs, 20 inches above the ground. The holes should be at the same height. Use a scrap 2-by-4 as a spacer or clamp the supports together while marking to improve alignment.
Place the frame between the supports and pass the pivot bolts through the stand holes. Add washers and wing nuts on the outside. The frame should swing at least 30 degrees in each direction. If it contacts a leg, loosen the bolts slightly, check for a crooked frame, and trim only after confirming the problem.
Use and Adjust the Sifter
Set the stand over a wheelbarrow with the barrow centered below the screen. Add no more than 2 to 3 inches of compost at a time. Rock the frame through short strokes rather than forcing it to a steep angle. Fine material drops through while larger debris moves toward the lower edge.
Wet compost is the most common failure point. It smears across the mesh and forms balls that will not pass through. Let material dry for a day or two under cover, or use a wider 3/4-inch screen for damp autumn compost. Very dry material creates dust, so wear eye protection and a dust mask when processing old, dusty soil.
If the screen sags, add a 1-by-2 stiffener across the center of the underside. If the frame feels too heavy, replace the 1-by-4 lumber with 1-by-3 boards, but do not reduce the screen support around the pivot holes. For a replacement screen, galvanized hardware-cloth staples are preferable to light upholstery staples.
Seasonal Storage and Maintenance
At the end of spring and summer use, brush compost off the frame and rinse the screen if it is clogged. Let the wood dry fully before storing it. Tighten loose screws and inspect the wire around the pivot area, where repeated rocking causes the most movement.
For fall leaf compost, the same 1/2-inch screen works well, though fresh leaves may bridge across the mesh. Chop them with a mower first. In winter, keep the sifter under cover; trapped water can freeze around the screen and split the frame. The cheaper untreated-lumber option is fine if you store it in a shed, while treated lumber or exterior paint is worth the extra cost for a stand left beside the garden.