What's inside
As an Amazon Associate I earn from qualifying purchases. This post may contain affiliate links at no extra cost to you.
Contents
Best Circle-Cutting Router Jigs for Accurate Cuts
For most woodworkers, the best circle cut router jig is a rigid, adjustable trammel-style jig that fits their router’s base and covers the circle diameters they actually need; choose a compact commercial jig for occasional small-to-medium circles, or a longer shop-made beam for large tabletops and panels.
The key buying checks are the jig’s usable radius, how it attaches to your router, and whether its pivot stays put under cutting pressure. A jig’s advertised maximum diameter can be misleading: the bit’s offset from the pivot and the router’s mounting pattern determine the real range.
As an Amazon Associate we earn from qualifying purchases at no extra cost to you.
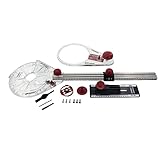


Compare the main options
These are practical planning ranges, not guaranteed specifications for every model. Confirm the current manual and included hardware before buying, especially if your router has a nonstandard base or needs a separate adapter.
| Jig type | Typical circle diameter | Router fit and setup | Best for |
|---|---|---|---|
| Compact adjustable commercial jig | About 4–24 in. (100–610 mm) | Base-specific plate or universal plate; check hole pattern and bit clearance | Repeatable small and medium circles, occasional furniture work |
| Long commercial trammel | About 6–48 in. (150–1,220 mm) | Usually requires a compatible base plate; long arms need firm support | Large panels and frequent circle cutting without making a jig |
| Shop-made plywood or hardwood beam | Limited mainly by beam length and workpiece size | Router screws to a drilled plate or the beam; layout and pivot are your responsibility | Infrequent large circles, unusual router bases, low-cost setups |
| Pin-and-hole or fixed-radius jig | One or a few set diameters | Simple direct attachment, but changing size may mean redrilling | Repeated production of the same size |
For common router brands such as Bosch, DeWalt, Makita, and Milwaukee, compatibility varies by router model and jig plate—not just by brand. A router jig to cut circles may attach through the base’s existing screw holes, a replacement base plate, or a universal adapter. Compare the actual hole spacing and screw size against the jig instructions. Never assume that a plate is compatible because its listing names your router brand.
Choose by job, not by the largest advertised circle
- Small openings or speaker rings: Pick a jig with a secure pivot and fine radius adjustment. Check its minimum radius against the router-bit centerline; a wide base may collide with the pivot at very small sizes.
- Furniture parts and occasional signs: A compact commercial wood router circle jig is usually the least fussy choice if it fits your router and reaches your largest planned diameter.
- Large tabletops or cabinet panels: Use a long trammel with a stiff arm, or make a beam jig from stable sheet material. A flexible arm can bow, making the arc slightly oval or changing the radius during the cut.
- Many identical circles: A fixed-radius jig with a positive pin location can be quicker to reset than a scale-based adjustable arm. Make a test cut before running a batch.
- One-off work on a tight budget: A shop-made jig can work well, but budget time for checking the pivot, fasteners, and router clearance. Cheap construction is not a bargain if the pivot shifts mid-cut.
Check the radius and router fit before cutting
Circle diameter is twice the radius, but the jig’s scale may show either measurement. Measure from the center of the pivot pin to the center of the router bit—not to the edge of the base or the end of the jig. For example, a 12-inch-diameter circle needs a 6-inch pivot-to-bit distance.
On many jigs, the pivot pin sits at one end and the router mounts farther along the arm. Set the desired distance, then rotate the router through a full turn by hand with the router unplugged. Confirm that the base, handles, cord, and dust hose do not hit the pivot or workpiece clamps. Also verify that the bit can reach the intended cut line; some setups measure to the bit center, while others use an offset mark or radius scale.
For a custom jig, make a test hole or shallow groove in scrap and measure it before cutting the final panel. If the measured diameter is too large by 1/8 inch, reduce the pivot-to-bit radius by 1/16 inch. Small radius errors are doubled in the finished diameter.
Setup for clean arcs in plywood and solid wood
- Prepare the workpiece. Support the full panel on a sacrificial sheet, and secure both pieces so neither can move. Keep clamps outside the router’s circular path. Mark the center carefully; a misplaced pivot creates a perfectly smooth circle in the wrong location.
- Make a secure pivot. Use the jig’s pin or a snug screw through a small pilot hole. The pivot must rotate freely without wobbling. If the jig uses a tack, seat it firmly and make sure it cannot pull out as the router turns.
- Set depth in stages. For a through-cut in 3/4-inch stock, use several shallow passes rather than trying to cut the full thickness at once. Leave a thin skin on the final pass, or use a sacrificial backing board, to reduce breakout as the bit exits.
- Choose the right bit and rotation. A sharp straight or spiral bit sized for the router and material can make a clean edge. Follow the router manufacturer’s direction for feed and rotation; circle cutting changes the direction of travel relative to the grain, so take light cuts and listen for strain.
- Cut a test arc. Check the radius, bit clearance, and jig stiffness on scrap of the same thickness. If the arm flexes or the pivot shifts, stop and correct the setup before cutting the workpiece.
- Finish the edge deliberately. In plywood, a sharp bit and shallow passes help limit veneer tear-out; a backing board supports the bottom veneer. In solid wood, keep cuts light and pay attention to grain direction, especially where the bit crosses end grain. Sand only enough to remove machining marks without changing the circle.
What wears, loosens, or causes inaccurate circles
The first weak points are often not the router: they are a worn pivot hole, loose mounting screws, or a thin arm that flexes. Repeated use can enlarge a wooden pivot hole, so inspect it and replace or reinforce the pivot area when it develops play. Check fasteners before each cut, and keep dust from building up around sliding adjustments, where it can prevent the radius from locking consistently.
Common accuracy problems include measuring to the router base instead of the bit center, clamping across the cutting path, using a dull bit, and taking a deep pass that twists the jig. A router jig circle cutter should feel stable throughout a full rotation. If it does not, use a stiffer beam, improve the pivot, or divide the cut into lighter passes. For a clean through-cut, remember that the finished plug can shift when the last fibers release; retain a thin skin or secure the center piece independently so it cannot tip into the bit.
For occasional work, a compatible compact jig is usually the sensible buy. Choose a longer commercial trammel when you regularly cut large circles and want ready-made adjustment hardware. If your router is an awkward fit or your circles exceed commercial jig capacity, a carefully built beam jig offers flexibility—provided you verify its radius on scrap before every critical cut.