
What's inside
As an Amazon Associate I earn from qualifying purchases. This post may contain affiliate links at no extra cost to you.
Contents
Choose the Bench That Matches the Space
A wooden storage bench and an open cubby bench can use nearly the same amount of floor space, but they solve different problems. The storage bench hides clutter behind a lid or doors. The cubby bench keeps shoes, baskets, and daily-use items visible and easy to grab.
For a first woodworking project, the open cubby bench is usually more forgiving. It involves fewer moving parts, provides easier access for measuring and fastening, and does not require a lid to fit perfectly. A storage bench takes longer, but it gives a cleaner appearance in a hallway, bedroom, or dining area where visible shoes and bags would look messy.
As an Amazon Associate we earn from qualifying purchases at no extra cost to you.


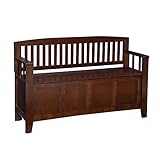

Before buying lumber, measure the wall and the objects the bench must hold. A useful entryway bench is commonly 36 to 48 inches wide, 16 to 20 inches deep, and 18 to 20 inches high. If several people will sit on it, build a longer top or add a center divider so the seat does not sag.
Storage Bench vs. Open Cubby Bench
| Factor | Wooden storage bench | Open cubby bench |
|---|---|---|
| Best for | Hiding blankets, toys, shoes, or seasonal items | Daily-use shoes, baskets, books, and bags |
| Beginner difficulty | Moderate, especially with a hinged lid | Easy to moderate |
| Ventilation | Limited unless you add holes or a gap | Excellent |
| Clutter control | Very good when closed | Depends on baskets and how often it is tidied |
| Common failure | Lid rubs, slams, or pulls screws out | Racking, sagging, or undersized cubbies |
| Typical hardware | Hinges, lid supports, and a catch | Screws, glue, and optional shelf pins |
When a Storage Bench Makes Sense
Choose a closed storage bench if the bench sits in a formal room, at the foot of a bed, or in a narrow entry where visual clutter is a problem. It is also the better choice for storing items that are used weekly rather than daily. A lift-up seat can hold hats, gloves, pet supplies, or extra throws without requiring another cabinet.
The simplest design is a rectangular box with a fixed bottom, a removable or hinged top, and a center divider. Use 3/4-inch plywood for the sides and divider, then add a solid-wood or plywood top. A divider at the midpoint reduces the unsupported span and keeps the box from twisting. For a 48-inch bench, do not rely on a thin 1/2-inch top unless you add cleats underneath.
Install two or three heavy-duty butt hinges or a continuous piano hinge, depending on the lid design. Add a lid support so the top cannot fall on fingers. Without a support, a heavy hardwood lid can slam shut and eventually loosen the hinge screws. Leave approximately 1/8 inch of clearance around the lid so seasonal wood movement and small assembly errors do not cause rubbing.
Do not make the box airtight. Damp shoes and wet clothing need airflow. Drill several 1-inch ventilation holes in the back or bottom, or leave a small gap behind the bench. For a safer, more finished result, use a bench lid support rather than a loose chain or improvised stop.
When an Open Cubby Bench Makes Sense
An open cubby bench is the practical choice for a busy family entryway. Each compartment can hold a pair of shoes, a basket, or a backpack, and you can see immediately what needs to be put away. It is also the cheaper build because it needs less hardware and usually wastes less plywood.
Plan cubby dimensions around the containers you already own. A 12-inch-wide by 14-inch-high opening handles most adult shoes and small baskets. Boots may need 16 to 18 inches of clear height. Remember that a nominal 1-by-12 board is only about 11 1/4 inches wide, so it will not create a 12-inch-deep bench without a separate top or wider panel.
Build the carcass square and add a back panel if the bench will sit away from a wall. A 1/4-inch plywood back prevents racking, but it must be attached carefully. If the back panel is out of square, it can force the entire bench out of alignment. Check both diagonals before fastening: if they match within about 1/8 inch, the box is reasonably square.
Open cubbies look better with baskets, but baskets reduce usable space and add cost. If you want a neat appearance without building doors, measure first and buy storage baskets sized for the cubbies. Do not design 12-inch openings and then discover the baskets measure 12 1/2 inches across.
Materials and Tools for a First Build
For either style, 3/4-inch plywood is a reliable beginner material. It stays flatter than inexpensive solid boards and makes consistent square panels. Sanded pine plywood is adequate for paint. Birch plywood costs more but gives cleaner edges for clear finish. For a painted bench, budget for edge treatment: exposed plywood edges need iron-on edge banding, solid-wood strips, or several coats of filler and primer.
You will need a tape measure, combination square, drill-driver, clamps, sandpaper, and a circular saw with a straightedge guide. A pocket-hole jig can simplify face-frame and cleat assembly, but it is not a substitute for square cuts. Use 1 1/4-inch screws for joining 3/4-inch panels, and drill pilot holes near plywood edges to prevent blowout.
For a seat that will carry adults, glue every structural joint and use cleats beneath the top. Screws alone can loosen as the bench flexes. Round over or sand sharp front edges, especially if children will use the bench. Finish all faces, including hidden interior surfaces, so the panels absorb moisture more evenly.
Make the Final Choice
Build the open cubby bench if the project is your first cabinet, the contents change every day, or the bench will live in a mudroom. It is less expensive, easier to repair, and more tolerant of imperfect joinery. A coat of paint and matching baskets can make it look intentional rather than unfinished.
Build the storage bench if hiding clutter matters more than instant access. Expect extra time for lid fitting, hinge installation, ventilation, and safety hardware. If you want a softer seat, add a removable cushion after finishing; a bench cushion should be measured after the finished top is built, not before.
Whichever design you choose, anchor a tall or deep bench to the wall when children may climb on it. A simple wall cleat or two brackets prevents tipping. Spend money on straight panels, accurate measuring, and a safe lid support before upgrading to decorative trim. Those choices determine whether a beginner bench remains solid after its first season of daily use.