What's inside
- What to look for in beginner shop lighting
- Quick comparison: which shop light fits your situation?
- Best all-around choice: linkable 4-foot LED shop lights
- Head-to-head: suspended lights versus surface-mounted lights
- How many lights do you need? A worked example
- When a different type of light is the better pick
- Installation steps that prevent common mistakes
- Ownership realities: dust, heat, and replacement
- Related Guides
- What to look for in beginner shop lighting
- Quick comparison: which shop light fits your situation?
- Best all-around choice: linkable 4-foot LED shop lights
- Head-to-head: suspended lights versus surface-mounted lights
- How many lights do you need? A worked example
- When a different type of light is the better pick
- Installation steps that prevent common mistakes
- Ownership realities: dust, heat, and replacement
- Related Guides
As an Amazon Associate I earn from qualifying purchases. This post may contain affiliate links at no extra cost to you.
The best shop lighting for beginners is usually a pair of linkable 4-foot LED shop lights in the 4,000–5,000-lumen range, mounted overhead and supplemented by an adjustable task light at the workbench.
That setup is bright enough for measuring, layout, sanding, and assembly without forcing a first-time woodworker to design a complicated electrical system. The right choice depends on four practical questions: how much area you need to cover, whether color accuracy matters, how you will mount the fixtures, and how often you use the shop.
As an Amazon Associate we earn from qualifying purchases at no extra cost to you.

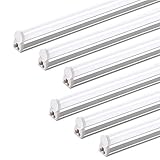
![hykolity 4FT LED Shop Light, 42W [250W Equivalent],4400LM,5000K Daylight](https://m.media-amazon.com/images/I/31OHKTx7DoL._SL160_.jpg)

Contents
- What to look for in beginner shop lighting
- Quick comparison: which shop light fits your situation?
- Best all-around choice: linkable 4-foot LED shop lights
- Head-to-head: suspended lights versus surface-mounted lights
- How many lights do you need? A worked example
- When a different type of light is the better pick
- Installation steps that prevent common mistakes
- Ownership realities: dust, heat, and replacement
- Related Guides
What to look for in beginner shop lighting
- Brightness: Plan on roughly 50–75 lumens per square foot for general woodworking, or about 75–100 lumens per square foot over a bench where you read pencil lines and inspect surfaces.
- Color quality: A color temperature between 4,000K and 5,000K gives a neutral-to-cool appearance. Look for a CRI of 80 or higher; CRI 90 or higher is preferable when matching stains, finishes, or paint colors.
- Coverage: Several moderately bright fixtures produce fewer harsh shadows than one extremely bright fixture.
- Mounting: Plug-in fixtures with chains or surface-mount brackets are generally easier for beginners than hardwired ceiling fixtures.
- Durability: A metal-backed fixture with a protected diffuser and a rated operating temperature suited to your garage or shed will usually outlast the cheapest plastic unit.
Quick comparison: which shop light fits your situation?
| Shop situation | Recommended setup | Typical brightness | Mounting | Approximate market cost |
|---|---|---|---|---|
| Small 8 × 10 ft room | Two 4-ft LED fixtures | 8,000–10,000 lumens total | Chains or surface brackets | $50–$120 |
| Typical 10 × 12 ft garage bay | Three or four 4-ft LED fixtures | 12,000–20,000 lumens total | Ceiling rows, linkable cords | $90–$240 |
| Long 12 × 20 ft workshop | Four to six fixtures, divided into zones | 20,000–30,000 lumens total | Surface-mounted or suspended | $160–$400 |
| Bench-focused detail work | General ceiling lights plus one adjustable task lamp | 800–1,500 task-lamp lumens | Clamp, arm, or weighted base | $30–$150 for task lighting |
These are planning ranges rather than guarantees. A dark ceiling, dusty air, tall rafters, or heavily shadowed machinery can make a room require more light. White or light-colored walls and ceilings improve perceived brightness, while unfinished dark wood and black equipment absorb it.
Best all-around choice: linkable 4-foot LED shop lights
For most beginners, a linkable 4-foot LED shop light is the easiest starting point. Typical fixtures consume 30–50 watts and produce approximately 4,000–5,500 lumens. Many include a pull chain, an on-cord switch, or a short power cord, and several can be connected in a row.
These lights are a better first purchase than a single oversized fixture because you can spread them over the room and add another unit later. Place two parallel rows over a workbench or assembly area rather than positioning one fixture directly behind you. Light from both sides reduces the shadow cast by your head and hands.
What specifications matter?
- Length: Four feet is the most useful size for common garages and basements. Two-foot fixtures suit cabinets, shelves, and compact benches.
- Output: Around 5,000 lumens per 4-foot fixture is a useful target for general-purpose lighting.
- Color temperature: 4,000K is comfortable for long sessions; 5,000K looks crisper and can make fine layout marks easier to see.
- CRI: Choose CRI 80 or better for ordinary work and CRI 90 or better if finish color decisions are important.
- Beam distribution: A wide, diffused output is preferable to a narrow spotlight for room lighting.
- Flicker: Look for fixtures advertised as flicker-reduced or flicker-free. A camera test or visible moving-blade test can reveal problematic flicker, but neither replaces the manufacturer’s electrical specifications.
Head-to-head: suspended lights versus surface-mounted lights
Suspended or chain-mounted fixtures
Chain-mounted lights hang several inches below the ceiling. This method is forgiving in a garage with exposed joists and lets you lower the fixture if shelves or rafters block the light. It also makes future repositioning easy.
The drawback is that chains and cords can interfere with tall workpieces, garage doors, or overhead storage. Keep the lowest part of the fixture high enough that lumber cannot strike it, and use strain relief where the cord enters the housing.
Surface-mounted fixtures
Surface mounting places the light close to the ceiling with brackets or screws. It is cleaner around a low ceiling and less likely to be hit by sheet goods. The trade-off is a narrower adjustment range and more careful measuring during installation.
For a beginner, surface mounting makes sense when the room is finished and the fixture locations are unlikely to change. Chain mounting is usually better for a developing workshop or a garage that still has storage and machinery to arrange.
How many lights do you need? A worked example
Suppose your workshop is 10 × 12 feet, giving you 120 square feet. At a planning target of 75 lumens per square foot, you need about 9,000 lumens for general woodworking:
120 square feet × 75 lumens = 9,000 lumens
Two fixtures rated at 4,500 lumens each meet that target on paper. In practice, three fixtures may be preferable if the ceiling is dark, the room contains tall cabinets, or you frequently work inside shadows. You can also use two ceiling fixtures plus a 1,000-lumen task lamp at the bench.
Divide the room into lighting zones if possible. One switch for the bench and another for the machine area prevents you from lighting the entire shop when you only need to sharpen a chisel or mark a board.
When a different type of light is the better pick
Integrated LED fixtures
Integrated LEDs are slim, efficient, and generally free of fluorescent-tube replacement. They are a strong choice for a new installation. Their main ownership disadvantage is that the LED board or driver may not be replaceable, so the entire fixture can become electronic waste if it fails.
Fluorescent shop lights
Existing fluorescent fixtures do not need to be discarded automatically. They can provide useful light if the tubes, ballasts, and wiring are in good condition. However, LEDs usually offer easier starting in cold spaces, lower energy use, and simpler maintenance. If replacing fluorescent tubes with LED retrofit tubes, verify ballast compatibility or remove and bypass the ballast only if the installation instructions and local electrical rules allow it.
Portable work lights
Portable LED work lights are useful for inspecting a cabinet interior, illuminating a saw blade area, or providing temporary light during installation. They should supplement, not replace, overhead lighting. A single portable lamp often creates deep shadows and glare, especially on glossy finishes.
Installation steps that prevent common mistakes
- Map the work areas. Mark the bench, assembly table, machines, and walkways before drilling. Light the places where your hands and measurements will be, not just the center of the room.
- Plan parallel rows. Rows running along the length of the room usually cover benches and lumber more evenly than one central row.
- Keep fixtures out of direct sight lines. If a bare LED source is visible whenever you look toward the bench, glare will become tiring. A diffuser or slightly higher mounting position helps.
- Secure every fixture mechanically. Do not rely on an adhesive hook or a cord to support the fixture. Use the supplied hardware in a ceiling joist, anchor, or suitable mounting surface.
- Leave service access. Avoid placing a fixture where a future replacement would require moving cabinets or climbing over machinery.
- Use proper electrical protection. Keep cords away from cutting paths and dust collection hoses. For hardwired work or new circuits, follow local electrical requirements and use a qualified electrician when needed.
Ownership realities: dust, heat, and replacement
Fine dust gradually coats diffusers and reduces output. Wipe fixtures with a dry or slightly damp microfiber cloth after disconnecting power; do not spray cleaner into vents or electrical housings. A monthly cleaning schedule is reasonable for a frequently used shop, while occasional-use spaces may need cleaning every few months.
The parts most likely to cause trouble are the switch, cord, connectors, and LED driver rather than the light-emitting diodes themselves. Avoid daisy-chaining more fixtures than the manufacturer permits, pulling a fixture by its cord, or operating an indoor-rated light in a damp location. In an unheated garage, check the minimum operating temperature before buying, since some electronics start poorly in severe cold.
For the best balance of cost and flexibility, begin with two linkable 4-foot LED fixtures rated around 4,500–5,000 lumens each, 4,000K or 5,000K, and CRI 80 or higher. Add a third overhead fixture or a high-CRI adjustable task lamp when your work involves detailed joinery, finish matching, or inspection. That staged approach gives beginners useful coverage immediately without locking the entire workshop into one lighting layout.