
What's inside
As an Amazon Associate I earn from qualifying purchases. This post may contain affiliate links at no extra cost to you.
A first storage bench is a useful place to learn joinery: it has a seat, a box, and several joints that must stay square under load. Pocket holes and dowels can both work. The better choice depends on your tools, how visible the fasteners will be, and whether you can clamp parts accurately—not on a blanket rule that one joint is stronger.
As an Amazon Associate we earn from qualifying purchases at no extra cost to you.


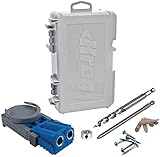

Contents
Choose for the bench you plan to build
For a straightforward bench made from 3/4-inch plywood, pocket screws are usually the easier first method. They pull panels together quickly, need little specialized setup, and can be placed inside the storage compartment where they are out of sight. For a bench with solid-wood sides, exposed ends, or a more furniture-like finish, dowels keep the outside clean, but they demand careful drilling and clamping.
Neither method should be asked to carry the entire seat load by itself. A 36- to 48-inch bench is better supported by a box structure with a center divider or cleat, a well-fastened seat, and sound material. Joinery helps keep the box aligned; the overall design and its supports matter just as much.
Pocket holes vs. dowels
| Factor | Pocket-hole joints | Dowel joints |
|---|---|---|
| Best fit | Plywood boxes and hidden interior joints | Clean-looking solid-wood or cabinet-style joints |
| Setup | Set a jig for stock thickness; drill angled holes | Mark matching hole centers; drill straight and consistently |
| Clamping | Screws draw parts together, but clamp to prevent shifting | Clamp while glue cures; dowels do not pull a loose joint closed reliably |
| Appearance | Visible holes unless plugged or hidden | No fastener holes on the outside when laid out correctly |
| Main risk | Blow-through, split edges, or a joint that slips during driving | Misaligned holes, shallow holes, or glue-starved joints |
| Cost and learning | Low entry cost; forgiving for a first box | Simple materials, but accurate layout takes practice |
Using pocket holes on a storage bench
A pocket-hole jig is a sensible purchase if you expect to build more than one box or cabinet. Choose a pocket-hole jig for 3/4-inch stock and match the screw length to the jig maker’s chart and the actual material thickness. A screw that is too long can pierce the outside face; one that is too short may not hold well.
For a plywood bench, drill holes on the inside faces of the front, back, and divider panels, then drive screws into the adjoining sides. Keep holes far enough from panel ends to avoid breaking out the edge. Plywood can be brittle at its plies, so test the jig and screw on scraps first. Use coarse-thread screws for softwoods and plywood when specified by the screw manufacturer; do not assume a screw meant for hardwood is interchangeable.
Clamp the parts flush before driving screws. The screw can shift a panel by a small but noticeable amount, leaving a stepped corner or a box that is out of square. Check diagonals before the glue sets: if the two diagonal measurements across a rectangular box differ, gently rack the box until they match. Pocket screws are convenient, but they do not replace a square assembly.
Do not overtighten. A stripped hole or a screw head driven too deeply into plywood weakens the connection. Keep the holes inside the storage area or under the seat, where appearance matters less. If the holes will show, plugs are an option, but they add work and may remain visible.
Using dowels for a cleaner exterior
Dowels make sense when you want smooth outer faces or are joining solid-wood rails and panels. A self-centering dowel jig can reduce layout errors, though it still needs a test fit. Use dowels sized for the material; for 3/4-inch stock, 3/8-inch dowels are common, but confirm there is enough wood around each hole, especially near an edge.
Mark the joint clearly and drill both mating pieces to the same depth. A depth stop or tape on the bit helps prevent drilling through the outside face. Leave a little extra depth beyond the dowel length for glue, and dry-fit the parts before applying adhesive. If the holes are off by even a few millimeters, the joint may refuse to close or may pull the corner out of square.
Apply a modest amount of wood glue in each hole and along the mating face. Too much glue can hydraulically resist the dowel as it enters, while too little can leave a weak bond. Clamp across the joint and verify alignment before the glue grabs. Dowels locate the parts, but they generally do not draw a poorly fitted joint tight the way a screw can.
Design the bench around the joint
Use 3/4-inch plywood for the main box rather than thin sheet goods, and add a center divider if the seat spans more than about 36 inches or will see regular adult use. A divider shortens the unsupported seat span and also gives you another place to fasten the top. For a long bench, add a front rail or cleat beneath the seat; a wide unsupported plywood lid can sag over time.
For either joint, glue clean, close-fitting mating surfaces where appropriate, and use screws or dowels as mechanical reinforcement. Predrill near plywood edges if you add ordinary screws, and keep fasteners clear of the seat’s top surface. If the bench will be outdoors, choose exterior-rated materials and adhesive; interior plywood and standard glue are not substitutes for weather-resistant construction.
A practical first-build choice
For a basic indoor bench with plywood sides, use pocket holes on the hidden faces, clamp the box square, and add a divider under the seat. It is a forgiving route and avoids buying a dowel jig solely for one project. If you already own a drill, clamps, and a suitable jig, pocket screws are often cheaper than spending time correcting misaligned dowel holes.
Choose dowels when the outside faces must be free of holes and you are willing to make a scrap test joint before cutting the bench parts. If this is a one-off utility bench and the joints will be hidden, a dowel jig is not necessary. Whichever method you choose, spend more attention on accurate cuts, square assembly, and support under the seat than on chasing a supposedly perfect joint.