What's inside
As an Amazon Associate I earn from qualifying purchases. This post may contain affiliate links at no extra cost to you.
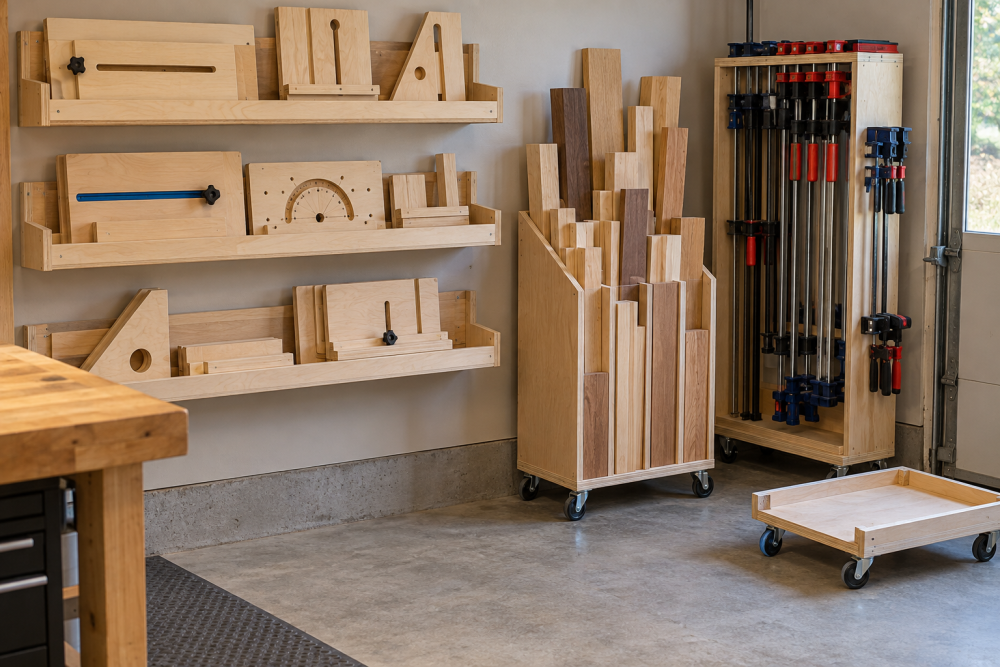
A mobile scrap-wood cart keeps useful offcuts sorted, visible, and off the floor. This design uses a plywood box, three divided bays, and four casters. It fits in a small shop and can be built with basic saws and a drill. The dimensions suit scraps up to about 24 inches long; adjust the cart height or bay widths for the material you actually save.
Contents
Dimensions and layout
The finished cart is 30 inches wide, 24 inches deep, and about 34 inches tall, including 4-inch casters. Its three compartments run front to back: two narrow bays for short pieces and one wider bay for larger offcuts. A low front wall lets you see and lift the contents. The back and sides are taller to keep stock from sliding out.
| Part | Quantity | Size (inches) |
|---|---|---|
| Bottom | 1 | 30 × 24 × 3/4 plywood |
| Back | 1 | 30 × 24 × 3/4 plywood |
| End panels | 2 | 24 × 24 × 3/4 plywood |
| Front rail | 1 | 30 × 6 × 3/4 plywood |
| Dividers | 2 | 22 1/2 × 18 × 3/4 plywood |
| Casters | 4 | 4-inch, two swivel-locking |
The divider height leaves room to reach into each bay without making the cart too top-heavy. The 22 1/2-inch divider length fits between the front rail and back panel. If your offcuts are longer, increase the cart depth; make sure the resulting loaded cart still clears doors and can turn in your shop.
Materials and tools
Use 3/4-inch plywood for the box and dividers. Construction-grade plywood is adequate; cabinet-grade stock gives cleaner faces but costs more and is unnecessary for a shop cart. Avoid swollen or delaminated sheets, which are harder to fasten securely. You will also need 1 1/4-inch wood screws, wood glue, and four casters with mounting plates. Choose casters rated for the expected load: scraps get heavy quickly, and the cart must also support its own weight.
For easier maneuvering, choose 4-inch plate-mount swivel casters, with at least two that lock. Smaller wheels can snag on cords and floor joints; larger wheels raise the cart and its center of gravity. A 3/4-inch plywood sheet is the straightforward choice. A circular saw and straightedge work fine for cutting it; a table saw is not required.
Gather a drill, tape measure, square, pencil, clamps, and eye and hearing protection. If the plywood edges are rough, sand them lightly. Do not round over edges so much that the dividers fit loosely.
Cut and assemble the box
Cut the bottom, back, end panels, front rail, and dividers to the sizes above. Check opposing pieces against each other before assembly. A small mismatch can leave the box out of square or create gaps where scraps catch.
Set the bottom on a flat surface. Apply a thin bead of glue to the lower edges of the back and end panels, then position them on top of the bottom: the back along one 30-inch edge and the ends between the front and back. Drill pilot holes to reduce splitting, then drive screws through the bottom into the panels about every 6 inches. Keep the screw tips from breaking through the outside faces.
Fit the 6-inch front rail between the end panels, flush with the bottom. Glue and screw it in place. Check the box diagonals: if they differ by more than about 1/8 inch, nudge the box square before the glue sets. An out-of-square box makes the dividers harder to fit and can cause a caster to sit unevenly.
Fit the dividers
Mark the divider positions on the bottom, measured from one end panel. For a practical layout, place one divider 8 inches from the left end and the second 18 inches from that same end. This creates bays approximately 8, 10, and 10 inches wide. These widths are starting points, not a rule: measure your usual offcuts first if you mostly keep trim, dowels, or narrow strips.
Stand each divider on its mark, with its front edge behind the front rail. Use a square to keep it perpendicular to the bottom. Glue the bottom edge and fasten through the bottom with pilot holes and screws spaced about 6 inches apart. Add two screws through the back panel into each divider. If scraps tend to push the dividers sideways, add small triangular plywood gussets near the rear corners. They stiffen the bays without taking much space.
Install casters and finish
Turn the cart upside down and mount one caster near each corner, set in far enough that its plate does not overhang an edge. Use bolts, washers, and locknuts if you can reach inside the box; screws into plywood are quicker but can loosen under repeated impacts. If using screws, choose a length that cannot poke through the bottom and check the caster plate holes before drilling.
Compare common wheel choices before buying:
| Caster type | Best for | Trade-off |
|---|---|---|
| Small hard wheels | Smooth concrete and light loads | Cheap, but more likely to stick at cracks |
| 4-inch swivel wheels | General shop use | Easy to steer; can wander unless locked |
| Fixed wheels | Straight travel in narrow aisles | Track well but require lifting or a wider turn |
Lock two casters on opposite corners, or use two swivel-locking casters and two fixed casters if the cart mostly travels in straight lines. Before loading it, roll the empty cart and confirm that all wheels touch the floor and locks hold. If one wheel rocks, check for a warped panel or a caster plate sitting on debris; do not compensate by over-tightening and crushing the plywood.
Test and load safely
Load heavy pieces low and spread them across the bottom. Keep long stock from rising far above the side panels, where it can shift and tip the cart. Push from the back or a solid end panel rather than pulling on a divider. Test the cart with a modest load first, then add weight gradually. A cart that flexes, develops loose caster fasteners, or becomes difficult to steer is overloaded or needs reinforcement.
For a useful sorting system, reserve each bay for a clear category, such as hardwood, sheet goods, and short cutoffs. Remove warped, split, or treated scraps you will not reuse. A cart only saves time if the material stays easy to identify and retrieve.