What's inside
As an Amazon Associate I earn from qualifying purchases. This post may contain affiliate links at no extra cost to you.
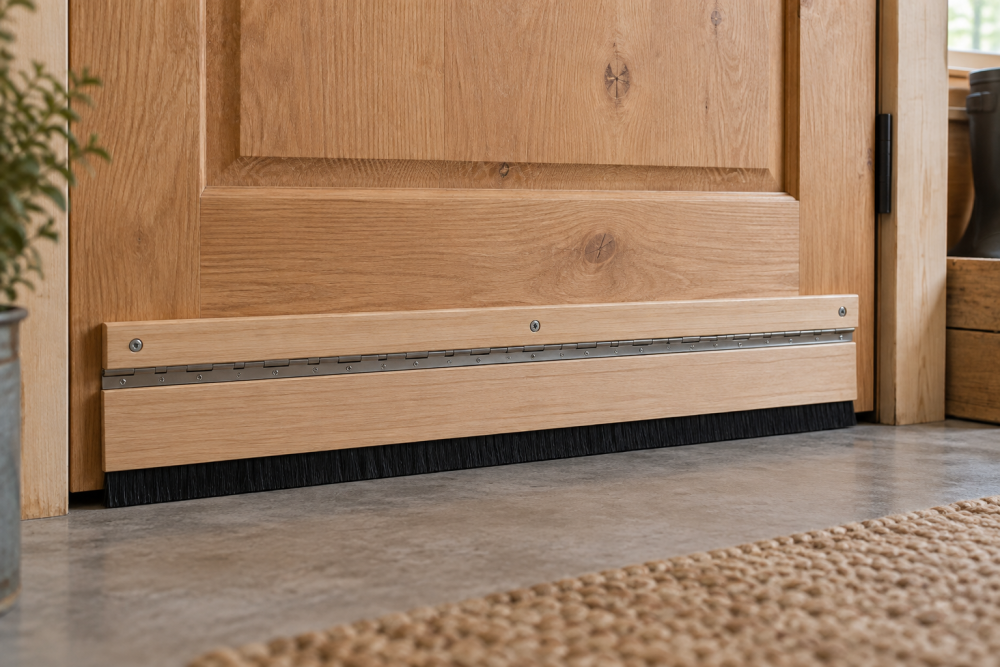
A wooden door draft stopper with a hinged top closes the gap under a door without dragging a long fabric tube across the floor. The top swings with the door, while a brush or flexible seal stays against the floor. It suits a workshop, shed, or back door where a permanent-looking wooden cover is welcome and the floor gap is fairly consistent.
Contents
How the hinged top works
The build has two parts: a fixed mounting rail screwed to the door, and a narrow flap attached to that rail with a continuous hinge. A strip of brush seal or flexible rubber on the flap’s lower edge meets the floor. As the door opens, the flap pivots rather than scraping sideways; when the door closes, gravity brings the seal back down.
This is not the best fix for a door with a gap that changes by more than about 1/2 inch across its width, or for a rough threshold with deep dips. A flexible sweep can follow small irregularities, but it will not seal large variations reliably. Check the floor and door clearance before buying materials.
Materials and tool choices
Use straight, stable wood for the rail and flap. Clear pine is inexpensive and easy to cut; hardwood is tougher but adds weight and cost. A flap around 3/8 inch thick and 2 to 2 1/2 inches tall is a practical starting point. Choose a strip of brush seal or flexible door-bottom gasket long enough to span the door, plus a continuous hinge roughly the same length.
| Choice | Good for | Trade-off |
|---|---|---|
| Brush seal | Uneven floors and light debris | Less airtight; bristles wear over time |
| Flexible rubber gasket | Smoother floors and stronger air seal | Can drag or catch on rugs and raised thresholds |
| Continuous hinge | Even support along a long flap | More drilling and fitting than short hinges |
| Two small hinges | A low-cost build with a short flap | More likely to sag or bind if alignment is off |
A door-bottom brush seal is the forgiving choice if the floor is not perfectly level. For the hinge, a stainless-steel continuous hinge resists rust near an exterior door, though a basic plated hinge is fine for a dry interior location.
Measure the door and floor gap
Measure the door width at the bottom and cut the rail about 1 inch shorter so it clears the jambs. Close the door and measure the gap from the door’s bottom edge to the floor at the left, center, and right. Record the largest gap and note any rugs, thresholds, or floor transitions in the swing path.
Plan the flap so the seal just touches the floor when the door is closed. Do not size it to press hard into the floor: too much pressure makes the flap noisy, wears the seal, and can stop it returning after the door opens. If the gap varies, let the brush bristles extend about 1/4 inch beyond the measured gap at the widest point; trim only after testing.
Build and fit the stopper
Cut the mounting rail to length, typically 1 by 1 1/2 inches, and sand its edges. Cut the flap to the same length from straight stock. The exact dimensions matter less than having enough room for the hinge and seal without the flap hitting the floor or threshold. Round the flap’s lower corners slightly so they do not catch.
Lay the rail and flap flat with their long edges aligned. Install the hinge so the flap can swing down freely and fold back toward the door. Predrill the screw holes; small screws in thin wood can split the edge, especially near the ends. Test the hinge movement before attaching the seal. If you use two small hinges instead, set them near the ends and check that their barrels line up on one axis.
Attach the brush or gasket to the flap’s lower edge according to its mounting method. Brush strips often screw into a channel; some flexible seals are stapled or screwed through a backing strip. Keep fasteners clear of the bristles and gasket lip. Cut the seal slightly long, test the fit, then trim it flush with a utility knife or fine-tooth saw.
Hold the assembly against the inside face of the closed door, with the flap hanging down and the seal meeting the floor. Mark the rail position, then screw the rail to the door using at least three screws spaced across its length. Use screws long enough to bite securely into the door, but not so long that they risk reaching the other face. If the door is hollow-core, use suitable hollow-door anchors or attach the rail to a solid lower rail if its position is known.
Test, adjust, and troubleshoot
Open and close the door slowly at least ten times. The flap should rise without catching the jamb, rug, or threshold and should fall back into contact when the door shuts. If it stays raised, the hinge may be binding, the flap may be too heavy, or the seal may be pressing too hard. Loosen the hinge screws slightly, check alignment, and reduce seal pressure before adding a return spring.
If light still shows under the door, first check that the rail is level and the seal reaches the floor across the full width. On an uneven floor, brush bristles usually outperform solid rubber. If the door becomes hard to open, shorten the seal or move the assembly up a fraction. A gap under 1/4 inch may need only a compact sweep; for a larger gap, a taller flap and longer bristles may work, but confirm that the assembly clears the floor throughout the door’s swing.
Finish and maintenance
Ease sharp edges with 120- to 180-grit sandpaper and apply paint or a clear finish before final installation, keeping finish out of the hinge knuckles and seal. Inspect the screws and seal every few months, especially on an exterior door exposed to grit or damp. Replace worn brush or rubber rather than forcing the flap tighter. The simple, inexpensive version is usually adequate indoors; spend more on corrosion-resistant hardware only where moisture makes it worthwhile.