What's inside
As an Amazon Associate I earn from qualifying purchases. This post may contain affiliate links at no extra cost to you.
Contents
Which Miller arc welder should you buy?
For typical home and farm repairs, the Miller Thunderbolt 210 DC Stick is the most balanced choice: it runs on 120V or 240V input, weighs about 15 lb, and covers 20–210 amps. Choose the lighter 120V-only Maxstar 161 S for occasional repairs on thinner steel, or a 240V machine such as the Maxstar 210 STR if you need more output and frequent-duty performance. Check the nameplate and current Miller manual before buying: specifications and included accessories can vary by model year and package.
This guide compares Miller electric arc welder options by power supply, amperage, portability, and the electrodes they can run. The electrode guidance is practical starting advice, not a substitute for the electrode manufacturer’s recommendations, joint design, or the machine’s duty-cycle limits.
As an Amazon Associate we earn from qualifying purchases at no extra cost to you.
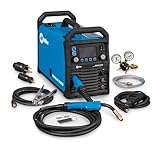


At a glance: Miller stick-welder options
| Model | Input power | Output range | Approx. bare-machine weight | Best fit |
|---|---|---|---|---|
| Miller Maxstar 161 S | 120V | 20–160A | 13 lb | Portable repairs and light-to-medium stick work |
| Miller Thunderbolt 210 DC Stick | 120V or 240V | 20–210A | About 15 lb | One compact machine for household and shop repairs |
| Miller Maxstar 210 STR | 120V or 240V | 20–210A | About 15 lb | Portable, higher-output work with professional-oriented features |
Weights are approximate and refer to the power source, not the leads, electrode holder, ground clamp, or carrying gear. Input plugs, adapters, and package contents differ; verify compatibility with your outlet and the exact product configuration. The table is a useful shortlist, not a substitute for the current Miller specification sheet.
Choose by the job you actually do
Mostly small repairs, one 120V outlet, or frequent carrying: Maxstar 161 S
The Maxstar 161 S is the compact pick when portability matters more than maximum output. Its 160A ceiling is ample for many light repairs, brackets, gates, and small equipment fixes. A 120V supply is convenient, but available current depends on the circuit: a dedicated circuit and suitable extension lead matter, and a long, undersized cord can cause voltage drop and poor arc performance.
For common mild-steel work, 3/32-inch (2.4 mm) electrodes are a versatile size to keep on hand. A 1/8-inch (3.2 mm) rod may suit some jobs near the machine’s upper range, but whether it runs well depends on rod type, material thickness, and the power available at the outlet. Don’t assume the machine can deliver its maximum output continuously.
Mixed household and shop repairs: Thunderbolt 210 DC Stick
The Thunderbolt 210 is the flexible choice if you may weld both at a home 120V outlet and at a 240V shop receptacle. The extra input option makes it easier to match the machine to the site; 240V is generally the better choice when you need higher output. Its 210A maximum also gives more room for thicker material and larger electrodes than a small 120V-only unit.
For occasional repair work, 3/32-inch and 1/8-inch electrodes cover many practical tasks. A 5/32-inch (4.0 mm) electrode can be useful on suitable heavier work at adequate amperage, but should not be treated as a universal choice: it calls for a compatible machine setup, sufficient input power, and material thick enough to manage the heat. For thin stock, a smaller rod and careful fit-up help reduce burn-through.
Frequent use or demanding portable work: Maxstar 210 STR
The Maxstar 210 STR is worth considering when you want compact 210A-class output and expect to use the machine regularly. Its dual-voltage capability can help when moving between sites, while its feature set is aimed at controlled stick welding. Compare the current model’s arc controls and duty-cycle chart with the Thunderbolt before paying extra; “more features” only matters if those controls suit your electrodes and work.
For repair work, 1/8-inch electrodes are a useful general-purpose size when the joint and material allow. A 5/32-inch rod is for appropriately thick work and adequate output—not simply a way to weld faster. If most of your jobs involve thin sheet, a stick welder may be less forgiving than a process better suited to thin material.
Electrode size: a practical starting point
| Electrode diameter | Common repair use | Typical current starting range | What to check |
|---|---|---|---|
| 1/16 in (1.6 mm) | Very light steel and small, controlled welds | About 20–40A | Many machines and electrodes have limited availability at this size |
| 3/32 in (2.4 mm) | Light repairs, thin brackets, general small work | About 40–90A | Exact range varies considerably by electrode classification |
| 1/8 in (3.2 mm) | General repairs and medium-thickness steel | About 75–130A | Check the rod package; position and joint affect the setting |
| 5/32 in (4.0 mm) | Heavier sections and larger repair joints | About 110–180A | Requires enough input power and a suitable duty cycle |
These are broad starting ranges for common mild-steel stick electrodes, not universal settings. A 6010, 6011, 6013, or 7018 electrode can behave differently at the same diameter. Follow the range printed on the electrode packaging, then make a test weld on scrap of similar thickness. Rod diameter alone does not determine whether a repair is safe or sound.
Match the machine to your outlet and workload
- Budget and occasional use: A compact 120V model may cost less to set up if you already have a suitable circuit. It is a sensible choice for light repairs, but expect less headroom for larger rods.
- Limited space or mobile work: Compare bare-machine weight, then account for leads, helmet, gloves, electrodes, and a safe carrying case. A 13–15 lb power source is portable; the complete kit weighs more.
- Regular work or thicker steel: Favor access to 240V and compare duty-cycle ratings at the amperage you actually use. A machine’s maximum amperage is not a promise that it can weld continuously at that setting.
- Beginner use: A dual-voltage machine offers room to grow, but it doesn’t remove the need to learn electrode selection, polarity, joint preparation, and safe technique. Start on scrap and follow a recognized welding procedure for structural or safety-critical repairs.
As a quick workload check, estimate how long you weld in a ten-minute period. If a machine’s duty cycle is 30% at your chosen amperage, that corresponds to about three minutes of welding followed by cooling time under the conditions specified by the manufacturer. Duty cycle changes with output and ambient conditions, so use the chart for the exact model rather than applying one percentage to every setting.
Ownership details that affect the buying decision
The power source is only part of the cost. Budget for a properly rated electrode holder and ground clamp if they are not included, welding leads of adequate gauge and length, a helmet, gloves, and electrodes suited to your material. General market pricing varies by model, package, and region; compare complete kits rather than the bare-machine price alone.
Stick welding produces slag and spatter. After each job, let the machine cool as directed, keep its vents clear, and inspect cables, connectors, and the electrode holder for heat damage, loose connections, or cracked insulation. Replace worn or damaged accessories instead of continuing to use them. Store low-hydrogen electrodes such as 7018 according to their manufacturer’s moisture-control guidance; damp rods can contribute to poor weld quality.
Common avoidable problems include using a long, light-gauge extension cord, choosing a rod beyond the available input power, and welding over paint, rust, oil, or scale. Clean the joint to sound metal, confirm the correct polarity for the electrode, and secure the work clamp to clean material. For lifting points, vehicle frames, pressure-containing parts, or other safety-critical repairs, use qualified guidance rather than relying on a general-purpose machine recommendation.
Bottom line
Choose the Maxstar 161 S for light repairs where low weight and 120V access take priority. Pick the Thunderbolt 210 DC Stick if you want a versatile dual-voltage machine for mixed home and shop use. Consider the Maxstar 210 STR for portable 210A-class work when its controls and duty-cycle performance match regular use. Before ordering any Miller arc welder, verify the current input requirements, output and duty-cycle chart, electrode compatibility, and what the package includes.