What's inside
As an Amazon Associate I earn from qualifying purchases. This post may contain affiliate links at no extra cost to you.
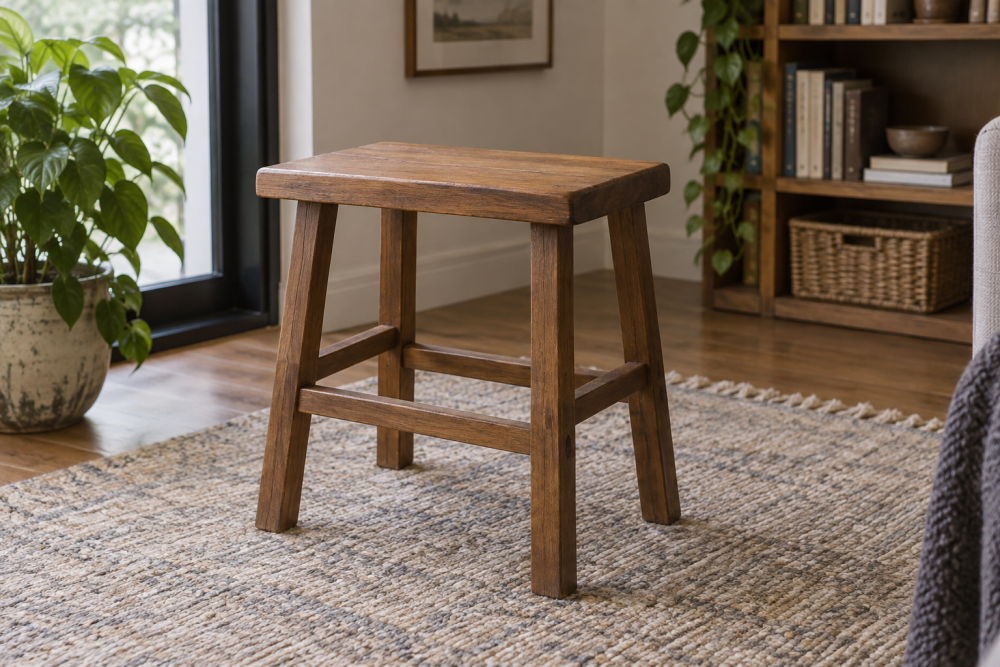
This small wooden stool is a useful weekend project and a good introduction to traditional joinery. The base uses four legs joined to the rails with mortise-and-tenon joints, so it is stronger and more repairable than a stool assembled only with screws. The finished stool is about 18 inches high, 14 inches wide, and 14 inches deep—comfortable as a plant stand, footstool, or occasional seat.
Contents
Project overview
Build the base from straight, dry hardwood and make the seat from a glued-up panel or a solid board. Oak, ash, maple, beech, and cherry all work well. Pine is cheaper and easier to cut, but its soft fibers can crush around the mortises and dents will show quickly. If this is your first mortise-and-tenon project, straight-grained ash or soft maple offers a useful balance of price, strength, and workability.
| Part | Finished size | Quantity |
|---|---|---|
| Seat | 14 x 14 x 1 inch | 1 |
| Legs | 1-1/2 x 1-1/2 x 17-1/4 inches | 4 |
| Side and front rails | 3/4 x 2-1/2 x 10-1/2 inches | 4 |
| Mortise depth | 1-1/2 inches | 8 |
The rail dimensions leave approximately 1-1/2 inches of leg showing above the rails and allow the 14-inch seat to overhang the base by about 1-1/4 inches on each side. That overhang softens the appearance and makes the seat more comfortable to grip.
Tools and materials
You need a saw, marking knife or sharp pencil, combination square, clamps, drill, and a way to cut accurate mortises. A router with a straight bit is convenient, but a drill press, Forstner bit, and sharp chisel work just as well. A set of woodworking chisels is useful for cleaning mortise walls and paring tenon shoulders.
Use a 1/2-inch mortise and a 1/2-inch-thick tenon. Tenon length should be 1-1/2 inches, with shoulders left on all four sides. For the seat, a water-resistant wood glue is sufficient for indoor use. Add four 1-1/4-inch screws or figure-eight fasteners to attach the seat while allowing seasonal movement.
Prepare and mark the stock
Mill the legs and rails to final thickness only after the boards have acclimated to your shop for several days. Letting cold or damp lumber sit indoors reduces later movement. Check each leg for twist by sighting along its length. A small bow can be turned toward the inside of the base; a twisted leg is better rejected.
Mark the legs clearly as front left, front right, rear left, and rear right. Put the best-looking faces outward. On each leg, mark the top of the rail position 1-1/2 inches below the top. Mark mortise centers 3/8 inch from the outside face, keeping the mortises aligned so the rails meet squarely at each corner.
Cut the mortises and tenons
Set a marking gauge to 1/2 inch and mark both sides of every mortise. The mortise should be centered in the 1-1/2-inch leg, leaving about 1/2 inch of wood on each side. Stop the mortise 1/2 inch above the bottom of the leg so the leg retains strength.
Cut the mortises to 1-1/2 inches deep. When using a drill press, bore overlapping holes slightly shallower than the final depth, then square the walls with a chisel. With a router, use a guide or jig rather than trying to freehand the opening. A straight router bit set is convenient, but inexpensive bits can leave burn marks or wander if the collet is dirty.
Mark the tenons on both ends of each rail. Cut the cheeks first, then trim the shoulders so the tenon is 1/2 inch thick and fits the mortise without force. Test each joint independently. The tenon should slide in with firm hand pressure and no visible gap at the shoulder. Do not hammer a tight tenon into place; it can split the leg or force the mortise open.
Dry-fit and square the base
Assemble the front and back pairs first, then connect them with the side rails. Use clamps lightly and check that the top edges of the rails line up. Measure both diagonals of the base. If the measurements differ by more than 1/8 inch, push the longer diagonal inward before glue sets.
Check the stool on a flat floor. A short leg is easier to correct now than after the seat is attached. Mark the high legs, remove only a small amount with a block plane or sanding block, and check again. Avoid sanding the bottoms aggressively, because angled cuts can make the stool rock in another direction.
Glue and attach the seat
Apply glue to the mortise walls and tenon cheeks, but do not flood the joints. Excess glue has nowhere to go in a blind mortise and can prevent the shoulder from closing. Clamp the base in both directions, wipe squeeze-out with a damp cloth, and leave it undisturbed for at least 30 minutes; overnight is safer before trimming or sanding.
Ease the seat edges with a 1/8-inch round-over bit or sandpaper. Center the base beneath the seat and mark the screw locations from inside the rails. Drill pilot holes, especially in oak or maple. Screws should pass through the rails and enter the seat by about 5/8 inch. A figure-eight fastener set is the better choice if the seat is wide or the stool will live in a room with large humidity changes.
Sand and finish
Sand to 120 grit, then 180 grit if the surface will be painted or finished with oil. Do not over-sand the mortise-and-tenon shoulders; rounding them creates visible gaps. Break every sharp corner, including the bottoms of the legs, with two or three light sanding passes.
For an indoor stool, wipe-on polyurethane, hardwax oil, or several coats of wiping varnish are practical choices. Oil is easy to repair but offers less resistance to standing water. Polyurethane protects better but can look plasticky if applied too heavily. Apply finish in a warm, dust-free space and allow the stated drying time between coats. If building in winter, avoid bringing freshly finished parts into a cold garage, where curing may slow dramatically.
Common failures to avoid
Most weak stools come from loose tenons, rails that are not square, or glue applied to dusty joints. Another common mistake is making the mortises too close to the outside corner of the leg; leave at least 1/2 inch of material around them. If the stool is for regular adult seating, keep the joints tight, use sound hardwood, and avoid increasing the seat overhang without widening the base. The compact design is stable for normal use, but it is not a substitute for a broad, heavy shop stool.