What's inside
As an Amazon Associate I earn from qualifying purchases. This post may contain affiliate links at no extra cost to you.
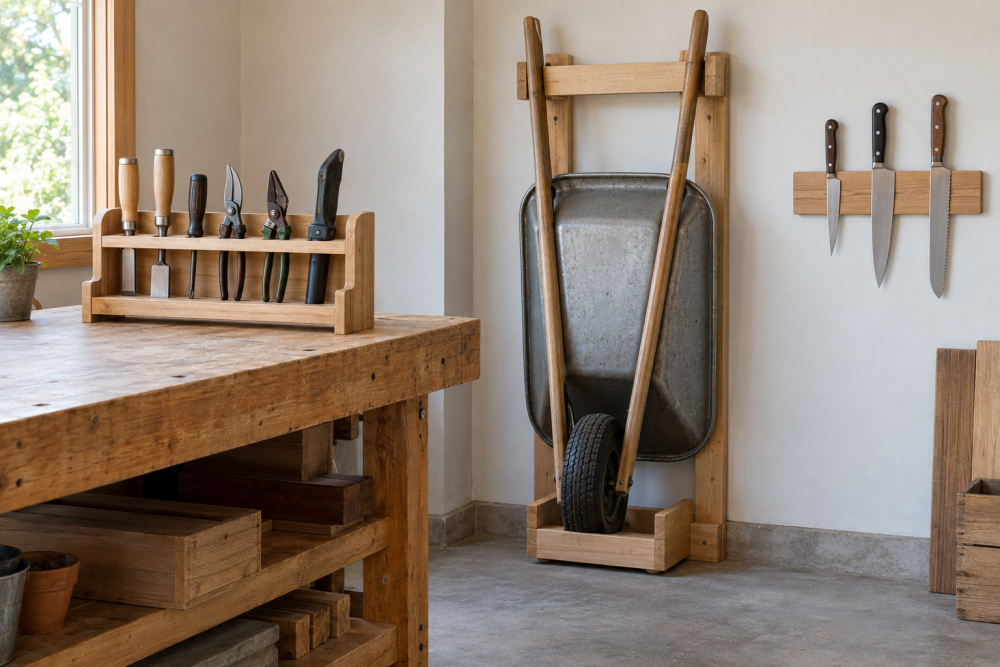
A wheelbarrow takes up far more garage space than its single tub suggests. Its handles stick out, the wheel rolls away, and the tray usually blocks a wall or walkway. This wooden wall holder stores the barrow upright, with the wheel resting on a lower shelf and the handles captured near shoulder height.
The holder works for most one-wheel wheelbarrows with handles spaced 18 to 28 inches apart. Measure your barrow before cutting. A loaded garden barrow can weigh more than 100 pounds, so the wall attachment matters as much as the woodworking. This project suits a confident beginner and takes about two to three hours, not including paint or finish drying time.
Contents
Materials and tools
Use straight, sound lumber. Ordinary construction-grade 2x4s are adequate, although select pine produces a cleaner-looking holder with fewer knots. The main frame uses two 2×4 uprights, two 2×4 crosspieces, one lower wheel shelf, and two handle supports. Add plywood or scrap boards to form the shelf surface.
- Two 2×4 boards, each 48 inches long
- One 1×10 board, 24 inches long, for the wheel shelf
- One 3/4-inch plywood strip, about 8 by 24 inches, for shelf reinforcement
- Four 3-inch structural screws for wall mounting, plus washers
- Two 2 1/2-inch exterior-rated screws per frame joint
- Two lengths of 1-inch nylon webbing or two large utility hooks for handle retention
- Wood glue, sandpaper, exterior paint or polyurethane
You will also need a stud finder, tape measure, level, drill, countersink bit, clamps, and a saw. A stud finder is useful, but confirm its readings with a small pilot hole before relying on it for a heavy mount.
Size and layout
Measure the wheel diameter, handle width, and the distance from the wheel to the underside of the tub. The dimensions below fit a typical residential wheelbarrow. Increase the shelf width if your tire is wider than 6 inches.
| Part | Suggested size | Purpose |
|---|---|---|
| Vertical uprights | 2×4, 42 inches long | Transfer the load to wall studs |
| Upper crosspiece | 2×4, 24 inches long | Supports the handle straps |
| Lower crosspiece | 2×4, 24 inches long | Supports the wheel shelf |
| Wheel shelf | 1×10, 24 inches long | Receives the wheel and tire |
| Handle clearance | About 30 inches | Leaves room for the tub and handles |
For a narrow barrow, shorten the crosspieces to the measured handle spacing plus 4 inches. Do not make the shelf so deep that the wheel can roll off its front edge. A 10-inch shelf gives useful tire support while keeping the assembly compact.
Build the wooden frame
Cut the two uprights and crosspieces to length. Lay the uprights parallel on a flat surface, 20 inches apart on center. Position the lower crosspiece 8 to 10 inches above the floor. This height keeps the wheel clear of the floor while making it possible to lift the barrow into place without excessive effort.
Position the upper crosspiece about 34 inches above the lower one. Test this against your wheelbarrow: when the wheel sits on the shelf, the handles should contact or nearly contact the upper support. If the handles land below it, move the crosspiece down. If they hit above it, move it up. Drill two clearance holes through each upright into each crosspiece, apply glue, and drive 2 1/2-inch screws.
Cut the 1×10 shelf so it spans the lower crosspiece and extends 2 to 3 inches in front of it. Round or ease the front corners with sandpaper. Screw the shelf to the lower crosspiece with four evenly spaced screws. Add the plywood strip beneath the shelf if the board flexes; a loaded wheelbarrow should not bend the shelf noticeably.
Add handle retainers
The wheel shelf carries most of the weight, but the upper supports stop the barrow from tipping away from the wall. The simplest retainer is a pair of 1-inch webbing straps with buckles. Screw one end of each strap to the upper crosspiece, place the handles against the support, and wrap the straps around them.
Fixed utility hooks are quicker, but they must match the handle shape and spacing. Hooks that are too shallow let the handles bounce out; hooks that are too tight make storage frustrating. Leave at least 1/4 inch of clearance around each handle. A nylon webbing strap with buckle is generally the more adaptable choice.
Do not rely on a single loose bungee cord. It can stretch, snap, or allow one handle to slip free while the barrow is being stored. If you use hooks, add a secondary strap across both handles.
Mount it securely to the wall
Choose a wall with two studs behind the holder. Position the uprights so each one aligns with a stud, then hold the frame level and mark the mounting holes. Drill 1/8-inch pilot holes into the stud centers and fasten the uprights with 3-inch structural screws and washers.
Two screws, one near the top and one near the bottom of each upright, are the minimum. If the uprights do not line up with studs, install a 3/4-inch plywood backer spanning at least three studs first. Fasten the backer with structural screws, then attach the holder to it. Standard drywall anchors are not an acceptable substitute for a stud or a properly installed backer.
Before hanging the barrow, pull firmly on the shelf and upper crosspiece. If the frame shifts, the screws are not properly seated or the wall substrate is inadequate. A structural wood screw set costs more than ordinary wood screws, but this is one place where the cheaper option is a poor trade.
Finish and use the holder
Round sharp edges, sand to 120 or 150 grit, and seal the shelf and frame. Interior polyurethane is fine in a dry garage. Use exterior paint or spar urethane if the wheelbarrow regularly arrives wet. Add a strip of rubber mat or carpet to the shelf to reduce tire wear and prevent sliding.
To store the barrow, place the wheel at the center of the shelf, lift the handles until the tub clears the floor, and secure both handles. Keep the tire inflated properly; a soft tire makes lifting harder and increases the chance of the wheel rolling off-center. Inspect the screws and straps after the first week and again each season.
If the holder will be used by children, older adults, or anyone who cannot comfortably lift the barrow, build the shelf lower and add a small front lip. The lip should be no more than 1 inch high, since a taller lip makes loading harder. For unusually heavy steel barrows, double the shelf support with a second 2×4 beneath it rather than simply adding more finish.