
What's inside
As an Amazon Associate I earn from qualifying purchases. This post may contain affiliate links at no extra cost to you.
Contents
Why The Material Matters For a Painted Toy Chest
For a painted toy chest, you want a smooth, dent-resistant surface that stays flat, holds hinges and lid supports securely, and survives being dragged across a bedroom floor. Both 3/4″ plywood and 3/4″ MDF will give you that smooth painted finish, but they fail in very different ways. Plywood can have voids and telegraph grain through paint if you skip prep. MDF gives a flawless surface but swells irreversibly if moisture gets into an edge and it does not hold screws well on its own. Your choice affects weight, cost, joinery, and how well that soft-close lid actually works.
Plywood For a Toy Chest: Pros and Cons
Use 3/4″ cabinet-grade plywood, typically Baltic birch or maple veneer with 7 to 13 plies. A full 4×8 sheet runs $65 to $95 depending on species and region, and a standard 32″W x 18″D x 18″H chest needs about one sheet plus a little extra for the lid.
As an Amazon Associate we earn from qualifying purchases at no extra cost to you.

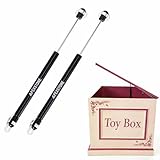
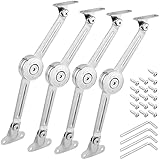
The big advantage is strength and screw holding. Plywood holds #8 wood screws at 250+ lbs of pull-out force in face grain and around 150 lbs in edge grain when you pre-drill. That matters for lid hinges, bottom panel, and any cleats. It is also about 15% lighter than MDF. A 3/4″ 4×8 sheet of plywood weighs roughly 60-70 lbs versus 90-96 lbs for MDF, so the finished chest is noticeably easier to move.
The downsides are finish work and voids. Even good plywood has a wood grain that will show through paint unless you fill it. You need to sand to 180 grit, apply a high-solids primer like Zinsser BIN or a water-based wood primer, then fill grain with drywall compound or a dedicated grain filler, sand again, and prime a second time. Edges must be covered with iron-on edge banding or a solid wood lip, otherwise the plies look cheap and soak up paint unevenly. Cheap big-box plywood with softwood cores and voids is a false economy here – voids under a hinge screw will cause it to strip instantly, and voids on an edge will crush when you clamp.
Plywood is the better call if the chest will be moved often, if you want simple butt joints reinforced with glue and screws, or if you are building without a full shop. It tolerates dadoes, rabbets, and pocket screws well.
MDF For a Toy Chest: Pros and Cons
Medium-density fiberboard is compressed wood fiber and resin. A 3/4″ 4×8 sheet costs $40 to $55 and is perfectly flat and void-free. That is why painters love it. With one coat of primer and a light 220-grit sand, MDF gives a glass-smooth, spray-like finish even with a foam roller. No grain filling needed.
Where MDF struggles is structure and moisture. Face screw holding is decent at 150-180 lbs, but edge screw holding drops to 60-80 lbs and fails by crumbling. You cannot just drive screws into an MDF edge for the box joints or lid hinge. You need to drill a proper pilot (7/64″ for a #8 screw), use coarse-thread MDF confirmat screws or add solid wood corner blocks, dowels, or biscuits for strength. Construction adhesive plus screws is common, but glue alone on MDF edges is weak because the fibers soak it up.
Moisture is the other failure mode. Unsealed MDF swells 10-15% in thickness if water sits on it, and it never goes back flat. For a toy chest, that means every edge, especially the bottom edges that sit on the floor and the inside of the lid where sweaty hands touch, must be primed and painted, not left raw. Drops and dents are also an issue. MDF corners crush more easily than plywood and do not sand out cleanly.
Weight adds up too. A finished MDF chest this size can weigh 75-85 lbs empty, which makes it very stable but hard for one person to carry up stairs.
Head-To-Head Comparison
| Factor | 3/4″ Cabinet Plywood | 3/4″ MDF |
|---|---|---|
| Painted finish (out of box) | Good, but needs grain filling and 2 primer coats to hide grain | Excellent, smooth in 1 primer coat, no grain |
| Weight (4×8 sheet) | 60-70 lbs | 90-96 lbs |
| Cost per sheet | $65-$95 | $40-$55 |
| Screw holding in edge | ~150 lbs, reliable with pre-drill | ~60-80 lbs, needs confirmat screws or blocks |
| Moisture resistance | Moderate, exterior glue types better | Poor, swells permanently if unsealed |
| Best joinery | Dado/rabbet, pocket screws, glue + brads | Dado with glue + blocks, confirmats, dowels |
| Durability for kids | Resists dents, holds up to moving | Edges and corners dent/crush easily |
The Lid and Soft-Close Hardware
The lid is where material choice becomes a safety issue. A toy chest lid must not slam. You need a dedicated lid support that holds the lid open and closes slowly, plus a gap to prevent finger pinching. Do not use a standard cabinet door soft-close hinge alone – it is not rated to support a heavy toy chest lid.
Most soft close toy chest lid support hinges are rated by lid weight and size. A typical pair supports a 20-40 lb lid that is 30-36″ wide. A 3/4″ plywood lid at 32″ x 18″ weighs about 11-13 lbs. The same lid in MDF weighs 15-18 lbs. Both are within range, but the heavier MDF lid has more momentum if the support fails and puts more stress on screws.
For either material, mount the lid supports into solid wood, not just fiber or ply edge. The simplest way is to glue and screw a 3/4″ x 1-1/2″ hardwood cleat along the inside of the side panels where the support brackets attach, then drive the included screws into that cleat. If you use MDF for the sides, this cleat is non-negotiable. Without it, the support screws will wallow out after 50-100 open/close cycles and the lid will slam.
Build the lid as a torsion box or frame if you want to save weight: a 1/2″ MDF or plywood panel with a 3/4″ solid wood frame around the edge is lighter, stays flatter over time, and gives you solid wood to screw hinges into. Allow a 3/32″ to 1/8″ gap on all sides of the lid for paint build and wood movement, and add a finger gap or handle cutout. Use continuous piano hinge or three 2″ butt hinges through-bolted where possible, and add a lid stay on both left and right for even support.
Painting and Build Tips For Either Choice
Whichever material you choose, seal all six sides before assembly if you can. For plywood, sand to 150, fill knots with Bondo or wood filler, sand to 180, prime, sand to 220, then topcoat with acrylic enamel (satin or semi-gloss cleans best). For MDF, lightly scuff with 180, prime all edges twice – edges soak up 2-3x more primer – sand with 220, then topcoat. A small HVLP paint sprayer for furniture gives the most even coat, but a high-density foam roller followed by a light tip-off with a brush works if you keep the paint thin.
For joinery, cut the bottom panel to sit in a 3/8″ deep dado 3/4″ up from the bottom edge, not just screwed to the bottom. The bottom takes the entire load of toys – often 50-100 lbs – and a dado prevents blowout. Add 3/4″ triangular glue blocks or a 1×2 pine cleat in each bottom corner if you use MDF. Pre-drill everything and use 1-1/4″ coarse-thread screws for 3/4″ material.
Ventilation and safety: drill two 1/2″ ventilation holes in the back panel or leave a 1/2″ gap under the lid when closed, and make sure the chest cannot latch shut from inside. Many local codes require this for toy chests.
Which Should You Build With?
Choose plywood if this chest will be used hard, moved between rooms, or built with basic butt joints and pocket screws. It costs more and takes an extra day of filling and priming, but it holds hardware reliably and resists the bumps and kicks a kid’s room delivers. Baltic birch plywood with edge banding is the most durable painted option short of solid wood.
Choose MDF if your top priority is a perfect, spray-shop paint finish on a budget and the chest will stay in one dry spot. It is fine for a guest room or nursery piece that will not be dragged around, provided you add solid wood cleats for every hinge and lid support and you seal every edge with primer and paint. Do not use MDF if the chest might sit in a garage, basement, or near a damp exterior wall.
A common compromise that works well is hybrid: MDF for the lid panel where smoothness matters most, with a hardwood frame around it, and cabinet plywood for the box, bottom, and sides where strength matters most. You get the flawless top and the stronger structure without much extra cost.