What's inside
As an Amazon Associate I earn from qualifying purchases. This post may contain affiliate links at no extra cost to you.
Contents
What a Simple Loom Frame Actually Is
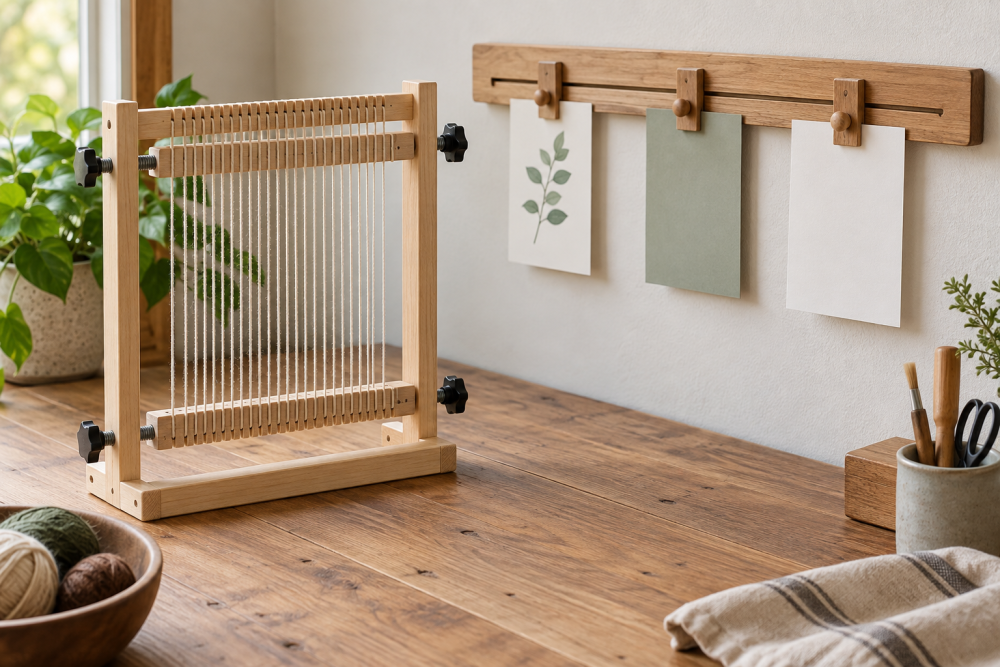
A wooden loom frame is just a rectangle that holds warp threads under even tension while you weave. The beginner version has four sides and two adjustable bars that let you tighten or loosen the warp without taking everything apart. You don’t need a stand, heddles, or a reed to start. If you can build a square picture frame that stays flat under 15-20 pounds of string tension, you can build this.
For a first loom, target an inside weaving area of 14 x 18 inches or 18 x 24 inches. Anything smaller than 12 inches is frustrating to work on, anything larger than 24 inches starts to bow unless you use thicker stock or add bracing. Most beginners do best with the 14 x 18 size. It fits on a table, uses less yarn, and stays rigid with 3/4-inch thick hardwood.
Materials and Cut List
Use hardwood if you can. Softwoods like pine and construction-grade spruce dent under tension, and screws pull out faster. You need stock that is straight, kiln-dried, and at least 3/4 inch thick by 1-1/2 to 2 inches wide. Actual dimensions of 1×2 hardwood (3/4 x 1-1/2) work well for the outer frame.
Cut list for a 14 x 18 inch weaving area (outside dimensions approx 15-1/2 x 21 inches with 3/4-inch stock):
Outer frame: Two long rails at 21 inches, two short rails at 15-1/2 inches. Two tension bars at 14 inches (these sit inside the frame). Four 1/4 x 3-inch carriage bolts with wing nuts and washers for the tension system. Wood glue, 1-1/4 inch #8 wood screws or 1-1/4 inch brad nails. Optional: four 3/8-inch hardwood dowels, 15-1/2 inches long, if you want removable warp rods instead of notching the frame.
If you want a larger 18 x 24 inch loom, add 1/4 inch to the thickness or add a center stretcher. At that span, 3/4 x 1-1/2 inch pine will deflect about 1/8 inch under full warp tension, which is enough to loosen your outer warp threads.
Choosing Wood for a Loom Frame
Not all wood behaves the same under constant tension. Here’s how common options compare for a small frame:
| Wood Species | Pros | Cons | Best For |
|---|---|---|---|
| Poplar | Cheap hardwood, machines cleanly, holds screws well | Slightly softer than maple/oak, can dent | Best budget choice for beginners |
| Hard Maple | Very stiff, resists bowing and wear at notches | Heavier, harder to drill and sand | Loom you plan to keep and use heavily |
| Red Oak | Strong, readily available at home centers | Open grain can snag yarn if not sanded well | Good middle ground if maple is not available |
| Pine / SPF | Cheapest, easy to cut | Soft, warps easily, screw holes strip, dents at tension slots | Practice build or kids project only |
If cost matters, poplar is the honest sweet spot. It costs only a few dollars more than pine per board but behaves much closer to maple. Save pine for a prototype if you’ve never cut a mortise or drilled square.
Tools You Actually Need
You don’t need a shop full of tools. For this frame you need a way to make square crosscuts, drill straight holes, and sand smooth so yarn doesn’t snag.
Essential: Tape measure, combination square, hand saw or miter saw, drill/driver with 1/4-inch and 3/8-inch bits, sandpaper (120 and 220 grit), and two bar clamps for woodworking. A pocket hole jig helps but is not required. If your cuts are made with a circular saw, clamp a straight edge as a guide to keep ends square. Out-of-square ends are the number one reason frames rack and won’t hold tension.
Nice to have: Doweling jig, card scraper, and a small router with a 1/8-inch roundover bit to ease all edges. Rounded edges prevent warp threads from cutting into sharp corners and fraying.
Building the Outer Frame So It Stays Square
Step 1 – Mill and check stock. Lay your four frame pieces on a flat surface like a tablesaw top or kitchen counter. Sight down each piece. If you see twist or a bow of more than 1/16 inch over 2 feet, swap the board. Loom frames show every bit of warp.
Step 2 – Cut to length. Cut the two long rails and two short rails. Label them. Check each end with a square. If an end is even 1 degree off, the frame will measure square diagonally but still rack under tension.
Step 3 – Join the corners. For beginners, glued and screwed butt joints are strong enough if you add a simple reinforcement. Apply glue, clamp, pre-drill with a 7/64-inch bit, and drive two 1-1/4 inch screws per corner. Then glue and pin a 3-inch hardwood dowel or a small plywood corner gusset (3 x 3 inch triangle of 1/4-inch plywood) on the back side of each corner. The gusset stops racking far better than screws alone.
Failure mode to avoid: Driving screws without pre-drilling in hardwood. The wood splits at the corner, the joint opens after a week of tension, and the frame goes out of square. Pre-drilling takes 30 seconds and prevents it.
Step 4 – Check for square. Measure diagonals corner to corner. Both measurements should be within 1/32 inch. If not, rack the frame gently before the glue sets. Sand all faces to 220 grit and break every edge with sandpaper so no sharp corner touches the yarn.
Making Adjustable Tension Bars
The tension bars are what make this loom usable. They are two separate bars that the warp wraps around. By moving them closer or further apart, you tighten or loosen the whole warp at once.
Each long rail needs a centered slot, 4 to 5 inches long and 1/4 inch wide, starting about 2 inches from the inside corner. The easiest way to make this without a router is to drill a 1/4-inch hole at each end of the slot location, then use a coping saw or jigsaw to connect the holes and file smooth. Clean slots matter. Rough slots bind the bolts and make adjustment jerky.
Drill a centered 1/4-inch hole through each end of both tension bars. Insert carriage bolts with wing nuts through the slot and the tension bar, with a washer on both sides. Wing nuts let you adjust tension by hand without tools. Tighten just enough to hold position. Over-tightening crushes the slot walls, especially in pine or poplar.
For the warp to grip, you need either notches or removable rods. Notches are simple: cut shallow V-notches every 1/4 inch along the top edge of each tension bar with a small saw. Depth of 1/16 to 1/8 inch is enough. Deeper notches weaken the bar and create uneven tension. The alternative is to tack hardwood dowel rods just inside the tension bars to wrap around. Dowels give more even spacing and are easier to replace if they get grooved.
Trade-off: Notches are faster to make and keep the warp from sliding sideways. Dowels are gentler on yarn and let you adjust warp spacing quickly, but they add a small step of drilling 3/8-inch holes in the side rails to seat them.
Assembly and First Warping
Install the tension bars with the bolts finger-tight, positioned about 1 inch in from each end of the slots. Place the frame on a table and warp with a smooth cotton string first to test.
Wrap with moderate tension, about as tight as a firm guitar string, not piano-wire tight. Then tighten the wing nuts and check the frame for bow. Sight along the long rails. If you see daylight under a straightedge, your warp is too tight or your stock is too light. Loosen the warp and move the tension bars out 1/4 inch instead of cranking harder.
Sand and wax the bars with paste wax or a quick buff of beeswax where the yarn contacts wood. This reduces friction and prevents the warp from sawing grooves into soft wood after a few projects.
Mistakes That Ruin Tension
Racking: Frame goes parallelogram-shaped after warping. Cause is weak corner joints or no gussets. Fix with plywood triangles on the back.
Uneven tension: Center threads tight, outer threads loose. Cause is bowed side rails or tension bars that flex. Fix by using thicker stock for the tension bars (go to 3/4 x 2 inches) or adding a shallow arch to the bar by sanding a 1/32-inch crown in the middle.
Stripped wing nuts: Bolt spins when you try to tighten. Cause is round hole in tension bar instead of a square-seated carriage bolt. Fix by tapping the carriage bolt head into the wood so the square neck bites, or use a hex bolt with a wrench.
Snagging: Yarn frays or pills on the frame. Cause is open grain or splinters at notches and edges. Fix by sanding to 220 grit, then sealing with two thin coats of shellac and a light sand. Don’t use thick polyurethane where yarn slides; it chips and creates sharp edges.
With the frame built and tested, you’re ready to weave. Keep your first warp simple and short. A 3-yard warp is enough to learn how tight is tight enough, and you can re-tension in seconds with the wing nuts once you feel how the wood and string interact.