What's inside
As an Amazon Associate I earn from qualifying purchases. This post may contain affiliate links at no extra cost to you.
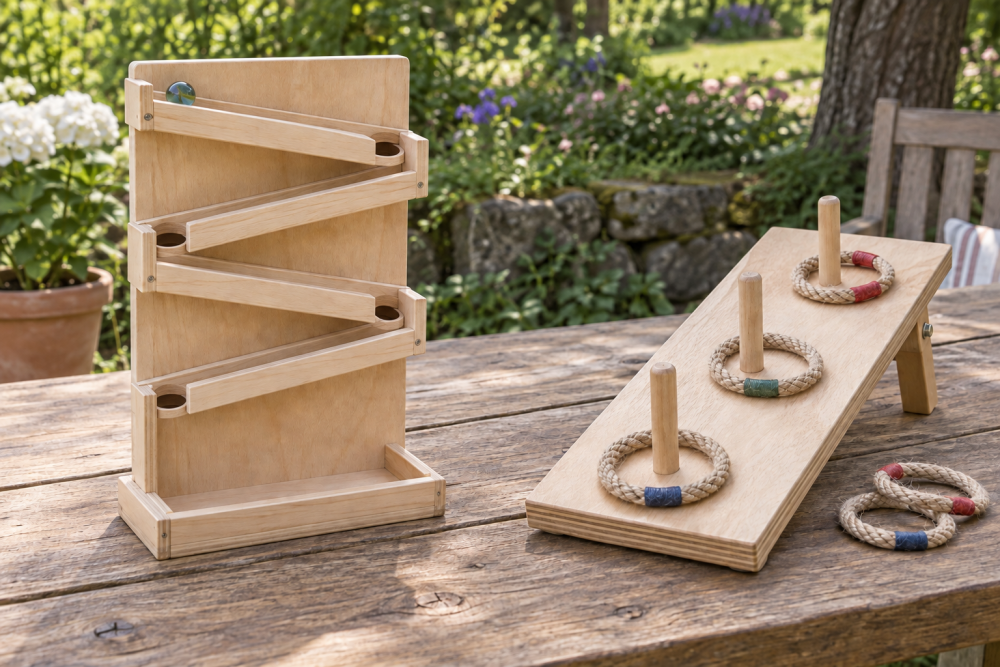
A wooden ring toss game is a manageable weekend project for a beginner with a drill, saw and a little patience. This version uses a folding plywood base, so it stores flat and is less likely to tip than a lightweight board with a single upright. The dimensions suit ordinary rope rings, but you can adjust the target spacing to fit rings you already own.
Contents
Size and layout
The playing surface is 18 by 24 inches. A 1-by-2-inch hardwood rail along each long edge stiffens the plywood and provides room for the folding legs. Three target pegs sit down the center line, spaced 6 inches apart. Each peg is 6 inches tall, leaving enough exposed height to catch a ring without making the game awkward to carry.
The base folds into a 24-by-18-inch panel. Two folding legs under the board open to support it at a slight angle. That angle helps rings settle around the pegs; a flat board works too, but rings tend to slide farther after landing. For outdoor use, keep the game on a level, dry surface. This is a lawn game, not a structure meant to bear a person’s weight.
Materials and tools
Use 1/2-inch exterior-grade plywood for the top. Interior plywood is cheaper and fine for occasional indoor play, but its layers can swell if rain or damp grass gets to them. Buy a straight 1-by-2-inch hardwood board for the side rails and legs, plus three 3/4-inch hardwood dowels for targets. The pegs can be softwood, though it dents more easily.
You’ll also need two hinges, four short screws for each hinge, wood glue, sandpaper, and a finish suited to where the game will be used. A box of 1-inch exterior wood screws is useful for attaching the rails and legs. Choose screws short enough that their points will not break through the plywood face.
For cutting, a circular saw with a straightedge is quick; a handsaw works if you’re comfortable making square cuts. A drill and bits are essential. A 3/4-inch brad-point bit makes cleaner, more controlled peg holes than a general-purpose twist bit. A basic twist bit is still adequate if you drill slowly and back the plywood with scrap.
Cut list and hardware choices
| Part | Quantity | Finished size | Notes |
|---|---|---|---|
| Plywood top | 1 | 18 × 24 × 1/2 in. | Exterior grade for outdoor use |
| Side rails | 2 | 24 × 1 1/2 × 3/4 in. | Cut from 1-by-2 stock |
| Folding legs | 2 | 16 × 1 1/2 × 3/4 in. | Round exposed corners |
| Target pegs | 3 | 6 × 3/4 in. diameter | Hardwood dowel |
For the hinges, small butt hinges are inexpensive and sturdy, but they take a little care to align. A pair of 2-inch butt hinges is a good fit. Folding table-leg brackets are faster to install and lock open, but they cost more and can make the legs sit farther from the edges. Either arrangement works; do not use loose hinges without a stop or latch if the board will be played on a sloped surface.
Build the board
Cut the plywood to 18 by 24 inches and sand the edges. Mark the center line across the 18-inch width, then mark peg centers at 6, 12 and 18 inches from one short end. Drill 3/4-inch holes about 1/2 inch deep. Clamp scrap wood beneath each hole to reduce splintering. Test a dowel in a hole before drilling all three: it should fit snugly but still be removable. If it is too tight, open the hole slightly with sandpaper wrapped around a dowel.
Cut the target pegs to 6 inches and ease the top edges with sandpaper. A sharp-edged peg can snag rings; a small rounded top helps rings slide down. Dry-fit the pegs, then glue them in place. Keep them vertical by checking from two directions while the glue sets. If the fit is loose, do not compensate with a thick puddle of glue; shim the hole with a thin wood shaving or make a new peg.
Glue and screw one rail along each 24-inch side, flush with the top edge. Drill pilot holes to prevent the rail from splitting, and use three screws per rail, spaced roughly 8 inches apart. Wipe away squeezed-out glue before it hardens.
Attach the folding base
Turn the board over. Position one leg across the width near each short end, about 2 inches in from the edge. Fit the hinges so the legs fold inward toward the middle of the board. Check that folded legs do not overlap; shift one leg slightly if necessary. Predrill the screw holes, then install the hinges with screws supplied or screws sized to stay within the leg and plywood thickness.
Open the legs and check that the board stands without rocking. If the hinges let the legs swing past a stable position, add a simple wood stop block beside each hinge or use locking folding-leg brackets instead. This is a common failure point: a leg that looks firm by hand may fold under a sideways bump. Test it with light pressure before playing, and keep fingers clear of the hinge pinch points.
Finish and test
Sand the playing face to 120 or 150 grit. Seal the plywood edges especially well; they absorb moisture faster than the face. For a game stored indoors, water-based polyurethane is a practical low-odor finish. For regular outdoor use, exterior varnish offers better weather resistance, but it needs more drying time and periodic renewal. Neither finish makes the board safe to leave outside in standing water.
Make rings from 1/4-inch rope, tying each into a loop about 6 inches across, or buy ready-made rings. Rope rings are cheap and easy to replace, but homemade knots can loosen; secure the knot and trim the tail. Test from 5 to 8 feet away. If rings bounce off the board, shorten the throw distance or add a thin rubber mat beneath the playing surface. Store the board folded and dry, and check hinge screws before each season.