What's inside
As an Amazon Associate I earn from qualifying purchases. This post may contain affiliate links at no extra cost to you.
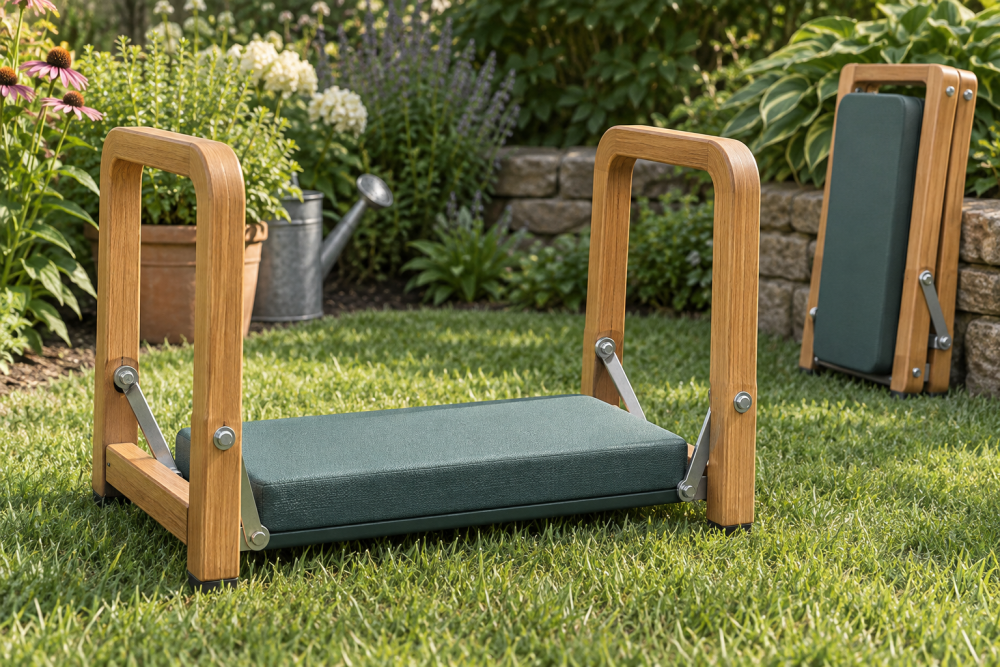
A folding garden kneeler with a slatted seat is a useful small woodworking project for spring planting, summer weeding, and autumn cleanup. It gives you a padded kneeling surface on one side and a low seat on the other, while the folding frame makes it easier to carry and store. The plan below uses common lumber, exterior screws, and a pair of hinges. It is suitable for a confident beginner with a saw, drill, and sander.
Contents
Finished Size and Materials
The finished kneeler is approximately 22 inches long, 19 inches wide, and 16 inches high when used as a seat. The kneeling panel is about 18 by 12 inches. These dimensions are a practical compromise: wide enough to feel stable but small enough to fit between garden rows.
| Part | Recommended material | Quantity |
|---|---|---|
| Side rails and legs | 1×3 exterior-rated boards | Four pieces, 22 inches long |
| Cross supports | 1×3 exterior-rated boards | Four pieces, 16 inches long |
| Slatted seat | 1×4 boards | Three pieces, 18 inches long |
| End blocks and braces | 1×3 offcuts | As needed |
| Hardware | Exterior screws, bolts, washers, and hinges | As specified below |
Use cedar, redwood, or treated pine. Cedar is easier to work and lighter, while treated pine costs less but can be wet, heavy, and prone to twisting as it dries. For a low-cost build, ordinary construction lumber is fine if you select straight boards and seal all surfaces. Avoid MDF, interior plywood, and untreated softwood if the kneeler will live outdoors.
You will also need two sturdy strap hinges or utility hinges, four 1/4-inch-diameter bolts about 2 1/2 inches long, matching washers and locknuts, exterior wood glue, and 1 1/4-inch exterior screws. A piece of outdoor cushion foam and fabric is optional for the kneeling side. If you need hardware, look for heavy-duty outdoor strap hinges rather than small cabinet hinges.
Cut and Prepare the Parts
Cut the boards to length, then mark each part so you do not confuse the two folding frames. Break every sharp corner with 120-grit sandpaper. Pay particular attention to the bottom ends of the legs; a sharp corner can dig into soil or catch on paving.
Before assembly, dry-fit the pieces on a flat floor. Lumber sold as 1×3 is usually only 3/4 inch thick and 2 1/2 inches wide, so check the actual dimensions before drilling. If your boards differ, keep the seat slats evenly spaced and adjust the support lengths rather than forcing the frame square.
Build the Two Folding Frames
Make two matching rectangular frames. Each frame consists of two 22-inch side rails joined by two 16-inch cross supports. Position one cross support about 3 inches from the top and the other about 3 inches from the bottom. Apply glue to the end grain, clamp the joints, and drive two screws through each rail into each support.
Predrill every screw hole, especially near the ends of cedar or dry pine. Without pilot holes, the rails can split and the frame may loosen after repeated folding. Check the diagonals of each frame before the glue sets. If the two diagonal measurements differ by more than 1/8 inch, push the frame square and reclamp it.
For a stronger version, add a third cross support beneath the seat area. This adds little weight but reduces flex when an adult sits down. The cheaper two-support layout is adequate for light gardening use, but it is not the best choice for a larger user or for sitting on hard ground where the legs cannot settle.
Install the Slatted Seat
Place the three 18-inch seat slats across one frame, leaving roughly 1/2 inch between boards for drainage. Center the slats from side to side and allow a small overhang at each edge if desired. Screw each slat to both side rails with two 1 1/4-inch screws per contact point.
Round over the front and rear edges with sandpaper. Slats are more practical than a solid seat because rain drains away and wet soil is less likely to stay trapped against the wood. They are also easier to replace. The trade-off is that narrow tools, gloves, or kneeling pads can fall through the gaps.
Connect the Folding Mechanism
Stand the two frames opposite each other, with the seat frame positioned above the second frame. Mark hinge locations near the upper ends of the side rails. Attach one hinge on each side, using bolts if the hinge leaves are wide enough. Bolted hinges resist loosening better than screws, particularly when the kneeler is carried by one side.
Drill 1/4-inch holes through the rails, add washers under both the bolt head and locknut, and tighten until snug. Do not crush the wood. The frames must pivot without binding. If the legs splay too far, add a short 1×3 limiting strap or chain between the lower rails. Set the spread so the seat is level and the legs sit firmly, then test it with both hands before sitting.
Hinges are a common failure point. Small decorative hinges can bend, screws can pull out of end grain, and over-tightened bolts can prevent folding. If the frame rocks, check that the legs are equal length and that the hinges are mounted at matching heights.
Add the Kneeling Pad and Finish
Attach a 1-inch-thick outdoor foam pad to the opposite face of the seat using hook-and-loop strips or outdoor adhesive. Removable fastening is preferable because the pad will eventually become wet and dirty. A water-resistant outdoor cushion material lasts longer than indoor upholstery foam.
Sand the entire frame through 150 grit, remove dust, and apply two coats of exterior spar varnish, deck stain, or penetrating outdoor oil. Seal end grain generously, especially at the leg bottoms and around drilled holes. Let the finish cure fully before using the kneeler; a soft finish can stick to gloves and attract grit.
Testing and Seasonal Storage
Test the finished kneeler on level ground. Press down on the seat with both hands, then sit carefully while keeping your feet clear of the folding joints. It should not rock, twist, or produce cracking sounds. Retighten the hardware after the first few uses because the wood fibers compress around bolts and screws.
For winter storage, brush off soil, let the wood dry, and fold the frame before placing it under cover. Store it off damp concrete. At the start of each season, inspect the hinges, replace rusty fasteners, and check for split rails. If the seat flexes more than about 1/4 inch under load, add the third cross support rather than simply driving in more screws.
A basic woodworking clamp and drill-bit set is enough for this project. Spend more on exterior hardware if the kneeler will stay outside; the cheapest screws and hinges are where a budget build usually fails first.