What's inside
As an Amazon Associate I earn from qualifying purchases. This post may contain affiliate links at no extra cost to you.
Drilling and plugging is one of the most useful beginner joinery skills. You drill a clean hole, drive a screw or bolt, then hide the fastener with a wooden plug. The method is easier than mortise-and-tenon work, but it still teaches layout, grain direction, drill control, glue application, and surface preparation.
These projects are deliberately small. Each gives you a useful object without requiring a full shop, and each exposes a different failure mode before you commit expensive lumber. A cordless drill, sharp brad-point bits, a countersink, clamps, glue, and a flush-cut saw are enough for most of them. A brad-point drill bit set is worth buying over a general-purpose twist-bit set because its center point is less likely to wander on wood.
As an Amazon Associate we earn from qualifying purchases at no extra cost to you.

Contents
What You Need Before Starting
For beginner plug joinery, use straight, flat stock between 12 and 19 mm thick. Softwoods such as pine are cheap and forgiving, but their end grain crushes easily. Poplar is a better practice wood if you want clean holes without paying for hardwood. Avoid warped boards, loose knots, and very thin parts; a plug hole close to an edge can split the workpiece.
| Tool or material | Good beginner choice | Why it matters |
|---|---|---|
| Drill bit | Brad-point bit sized to the plug | Starts accurately and leaves a cleaner shoulder |
| Fastener | #8 wood screw, about 32–40 mm long | Strong enough for small furniture and boxes |
| Plug cutter | Matching 8 or 10 mm cutter | Produces plugs from matching scrap |
| Adhesive | Standard PVA wood glue | Cheap, widely available, and adequate indoors |
| Trimming tool | Flush-cut saw or sharp chisel | Removes the plug without gouging the surface |
A wood plug cutter set is useful if you plan to make more than one project. For a single test piece, purchased plugs are fine and often cheaper than buying a cutter. Match the plug diameter to the hole; do not force an oversized plug into a shallow hole.
Project 1: Simple Step Stool
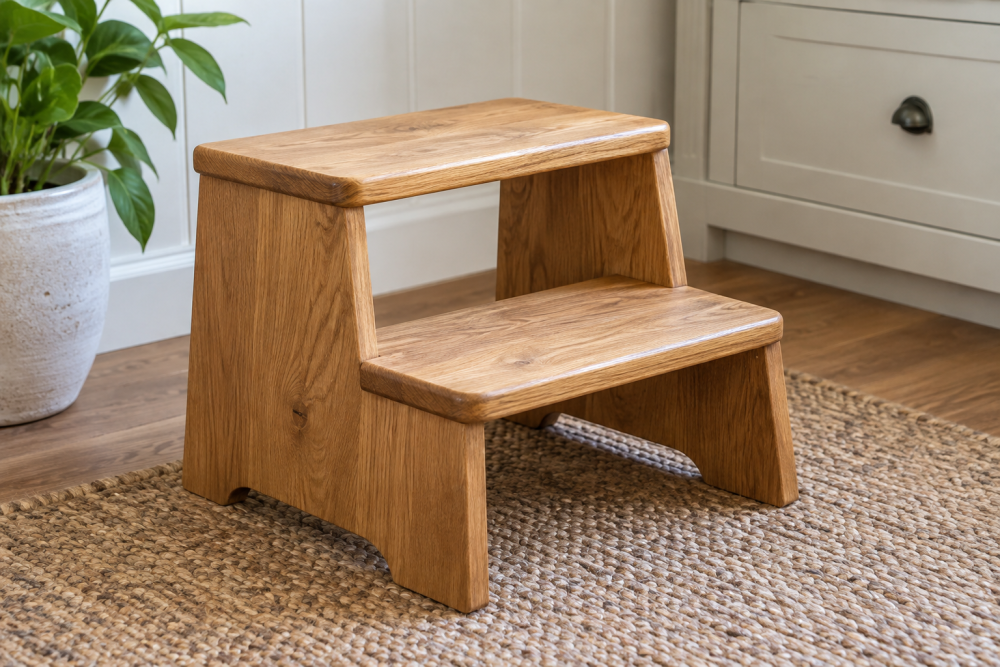
A low step stool is the best first project because it uses visible, forgiving joinery and teaches you to drill across the grain. Build it from two side panels, two steps or stretchers, and a top. A practical beginner size is about 400 mm wide, 250 mm deep, and 200 mm high.
Lay out two screws at each end of every stretcher, keeping holes at least 20 mm from an edge. Drill pilot holes through the side panels, then countersink them about 3 mm deep. Drive the screws until the heads sit below the surface, but stop before the countersink tears out. Apply glue to the mating edges before assembly; the screws are clamps as much as they are fasteners.
Cut plugs from matching scrap with the grain running in the same direction as the stool panel. Brush glue into each hole, tap the plug in with a scrap block, and leave it slightly proud. After the glue cures, trim it nearly flush with a flush-cut wood saw. Sanding alone can create a shallow dip around the plug, especially in soft pine.
The main failure is a split side panel. If the screw is within 10 mm of an edge, move the layout or use a smaller screw. Another common mistake is assembling on an uneven floor, which leaves the stool rocking. Check diagonals and place the stool on a flat surface before the glue sets.
Project 2: Small Wall-Mounted Shelf
A narrow shelf is a good second project because it combines face drilling with end-grain drilling. Make a shelf roughly 500 mm long by 150 mm deep, with a back cleat underneath. Use two screws through the shelf into the cleat, plus screws through the cleat into wall studs or suitable anchors.
Drill the shelf holes 30–40 mm from each end and at least 35 mm from the front edge. On the cleat, drill clearance holes for the screws rather than relying on the screw threads to pull the parts together. A clearance hole in the top piece lets the screw clamp the shelf tightly against the cleat.
Plug only the visible shelf face if you want to practice concealment. Leave the underside accessible for repairs. This is also the project where buying a woodworking countersink bit can save frustration. A separate drill bit and countersink work, but the depth is harder to repeat.
Do not treat plugs as a substitute for proper wall support. The shelf can be beautifully plugged and still pull out of drywall. Locate studs where possible, and keep the shelf load modest—books are much heavier than they look. For a rental or a light display shelf, the cheaper option of rated hollow-wall anchors is reasonable, but follow the anchor’s load rating rather than guessing.
Project 3: Small Storage Crate
A storage crate is ideal for a weekend project in spring or fall when you can work outside without extreme humidity. Build four sides from 12 mm boards and a 6 mm plywood or solid-wood bottom. Use plugged screws at the corners, where the joinery will be visible and easy to inspect.
Pre-drill into the end grain of the side boards using a bit about 1 mm smaller than the screw’s core diameter. Then drill a larger, shallow counterbore from the outside face. Keep the counterbore depth consistent—about 5 mm for an 8 mm plug. If the hole is too deep, the plug disappears and leaves a dark ring; if it is too shallow, the plug stands excessively proud.
Crates reveal whether your parts are square. Clamp the first two sides at 90 degrees, measure diagonals, and adjust until they match within about 2 mm. A glued, screwed crate that is out of square will not accept its bottom cleanly. Sand the plug ends lightly before glue-up, but do not round them over; rounded plugs leave gaps at the shoulder.
Project 4: Drill-and-Plug Practice Board
Before building furniture, make a practice board from scrap. Drill six holes: two shallow, two correct-depth, and two deliberately close to an edge. Use different screw lengths and plug sizes. This costs almost nothing and teaches more than trying to repair a finished project.
Practice setting the drill speed low enough to control the bit, keeping the drill perpendicular, and clearing chips from deep holes. Test your glue quantity as well. A thin coat is enough; excess glue can prevent a tight plug from seating and may show through an oil finish.
For the cleanest results, finish-sand the board only after the plugs are trimmed. Inspect it under raking light. Small gaps around plugs are normal in inexpensive softwood, but large gaps usually mean the cutter was dull, the plug was misaligned with the grain, or the hole and plug were not the same nominal size. Replace a bad plug rather than burying it under filler.
Choosing a Season and Finish
Indoor projects can be made year-round, but glue and finish behave best around 18–24°C. In a damp summer workshop, allow extra curing time before trimming plugs. In a cold garage, PVA may remain rubbery overnight. Bring lumber indoors for several days before building so it can adjust to the room where the project will live.
Use paint if the plugs do not match or the wood contains mixed colors. Use clear finish when the grain match is part of the design. A water-based finish dries quickly and stays relatively clear; oil-based finishes deepen softwood and can exaggerate differences between the plug and the surrounding board. Start with the step stool or practice board, then move to the shelf and crate once your holes are consistent.