What's inside
As an Amazon Associate I earn from qualifying purchases. This post may contain affiliate links at no extra cost to you.
A tapering jig lets you cut a straight, repeatable angle on a table saw. It is useful for furniture legs, braces, planter parts, and any board that needs one edge narrowed from one end to the other. Commercial jigs can be convenient, but a shop-made version is cheap, accurate, and easy to repair. This beginner-friendly design uses scrap plywood, a hardwood runner, and a few screws.
Contents
What You Are Making
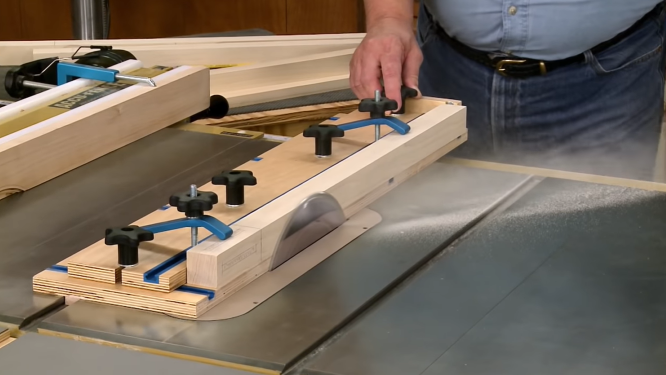
The jig is a flat sled that rides against the table saw’s fence. The workpiece is held at an angle on top of the sled, with one edge extending beyond the sled’s side. As the sled moves through the blade, the blade cuts the taper.
This design is intended for one-sided tapers. It works best for boards up to about 8 inches wide and 36 inches long. You can build a larger version, but a long sled becomes harder to control and more likely to flex.
| Material | Recommended size | Why it works |
|---|---|---|
| Sled base | 1/2-inch plywood, about 10 by 36 inches | Flat, stable, and easy to cut |
| Runner | 3/4 by 3/8 inch hardwood, about 30 inches long | Fits the table saw’s miter slot |
| Stop and clamp blocks | 3/4-inch scrap plywood or hardwood | Holds the workpiece without expensive hardware |
| Fasteners | 1-inch screws and wood glue | Simple and inexpensive construction |
Tools and Supplies
You need a table saw, drill, countersink bit, tape measure, square, pencil, and a straightedge. A jigsaw or circular saw can cut the plywood, although the table saw makes the parts easier to square. For safer workholding, a pair of woodworking toggle clamps is useful, but ordinary scrap-wood hold-downs work well for occasional projects.
Use straight, dry hardwood for the runner. Avoid soft pine if possible; it can compress in the slot and develop side-to-side play. If your table saw has an unusual miter-slot size, measure it before buying or cutting runner stock. A hardwood strip assortment can be handy if you do not have suitable offcuts.
Cut the Parts
Cut the plywood base to 10 by 36 inches. The exact length is not critical, but the base should be at least 6 inches longer than the longest workpiece you expect to taper. Check that both long edges are straight. A crooked edge will make the jig difficult to align with the saw fence.
Cut the runner about 6 inches shorter than the base. The gap at each end prevents the runner from extending into the blade path. If your saw’s miter slot is 3/8 inch deep, make the runner slightly shallower—about 5/16 inch—so it cannot rub on the bottom of the slot.
Cut a front stop approximately 3/4 by 2 by 10 inches and a rear stop about 3/4 by 2 by 10 inches. These pieces sit across the base and keep the workpiece from sliding lengthwise. If you plan to taper narrow stock, make the stops lower so they do not interfere with the blade.
Install the Runner
Place the runner in the saw’s miter slot. It should slide freely without noticeable side play. If it binds, plane or sand the runner lightly. If it moves more than about 1/32 inch from side to side, it is too loose for accurate work and should be replaced or shimmed.
Set the plywood base on the saw with one long edge against the fence. Position the base so the runner is centered in the miter slot. Add washers or pennies under the runner to hold it flush with, or just slightly below, the table surface. Drill and countersink three or four holes through the base into the runner. Drive the screws from the top.
Slide the jig back and forth before tightening the screws fully. It should move smoothly without lifting the base. A dab of paste wax on the runner and the bottom of the plywood reduces friction. Do not use oil; it can attract sawdust and make the jig grimy.
Add Stops and Hold-Downs
Glue and screw the front stop across the base near the front end, keeping it square to the runner. Install the rear stop near the far end. Leave at least 2 inches of clear space from the blade’s expected cutting line.
For a basic hold-down, screw a narrow scrap block to the sled beside the workpiece. The block should press the stock firmly against the base but must not touch the blade. A toggle clamp is quicker when you are making several identical parts. Whichever method you use, the workpiece must not be able to shift as the cut begins.
Do not rely on your hand to hold a narrow board near the blade. If the stock is too small for the stops or clamps, attach a larger sacrificial carrier board and clamp the small piece to that.
Lay Out the Taper
Mark the desired narrow end and wide end on the workpiece. Connect those marks with a straightedge. For a 2-inch taper over 30 inches, the cut line moves 2 inches from one end to the other. The angle is shallow, so small layout errors can noticeably change the result.
Place the board on the jig with the waste side extending beyond the sled’s cutting edge. Align the layout line with the blade’s teeth, then position the stops and clamp the board. Make sure the blade will remove material only from the waste side. Cutting on the wrong side is the most common beginner mistake.
Make the Cut
Unplug the saw while setting the jig and aligning the workpiece. With the blade lowered, slide the jig through its full travel to confirm that the base, stops, clamps, and workpiece will clear the blade. Check that the fence is not positioned so close that the jig can pinch between the fence and blade.
Install the proper blade guard and use a sharp general-purpose or ripping blade. Raise the blade so its gullets are just above the workpiece, usually about 1/8 to 1/4 inch above the top surface. Start the saw, stand to the side of the blade’s line, and push the sled steadily through the cut. Keep both hands on the sled handle areas, not near the exposed blade.
For a long board, use outfeed support. Without it, the workpiece or jig can dip at the end of the cut, causing a rough exit or binding. Let the blade stop completely before pulling the jig back.
Check and Correct the Result
Test the first cut on inexpensive scrap. Measure the wide and narrow ends and compare them with the plan. If the taper is uneven, check that the board did not move, the runner is not loose, and the layout line was transferred correctly. If the cut wanders, the blade may be dull or the sled may be flexing.
Burn marks usually indicate a dull blade, a pinched cut, or feeding too slowly. A rough edge can often be cleaned with a hand plane or sanding block, but a wandering taper is better fixed by rebuilding or adjusting the jig. Mark the jig with its intended maximum board width and taper direction so it is faster to use next time.
When to Buy Instead
A shop-made jig is the cheaper option when you need occasional tapers and already have scrap plywood. A commercial jig becomes worthwhile when you make tapered parts often or need quick, repeatable angle settings. Look for a table saw tapering jig with adjustable stops and secure hold-downs. For one-off furniture work, however, this plywood sled does the same basic job at much lower cost.