What's inside
As an Amazon Associate I earn from qualifying purchases. This post may contain affiliate links at no extra cost to you.
A hinged cover keeps leaves, rainwater, and neighborhood cats out of a sandbox, but the lid must be easy for an adult to operate and safe around small fingers. For a first build, a square box with two lightweight lid panels is simpler than a single heavy lid. This plan uses common lumber, basic cuts, and a frame that can sit on level ground or a prepared gravel base.
Contents
Choose a size and layout
A 4-by-4-foot sandbox is manageable for one beginner and works for one or two children. A 5-by-5-foot box gives more room but takes more lumber and needs a wider, flatter site. Plan on a finished wall height of 10 to 12 inches; fill it with about 6 inches of play sand, leaving space below the rim to contain splashes.
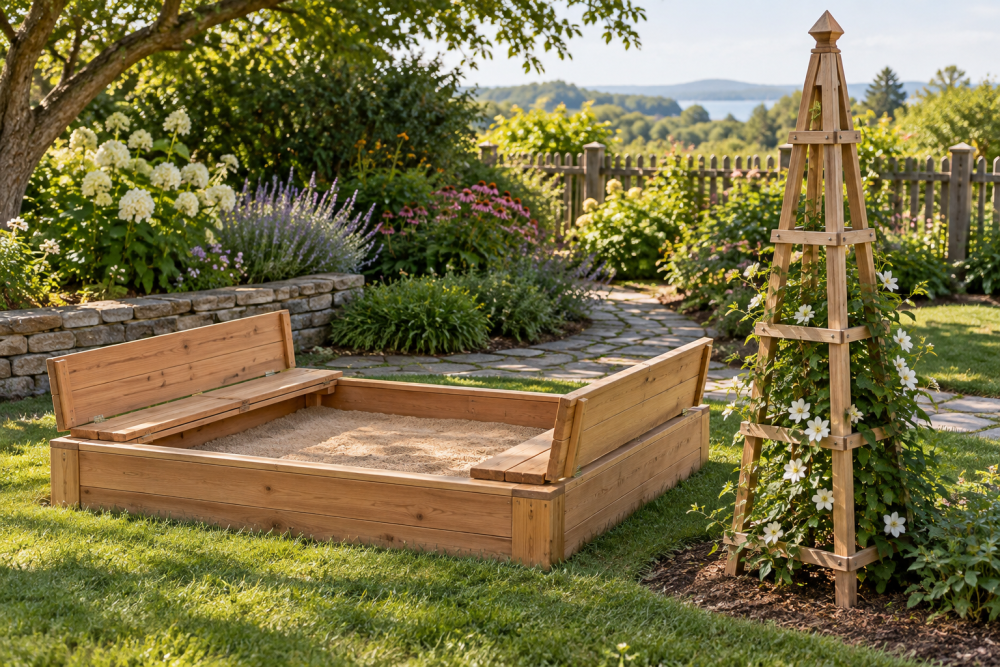
The cover below has two hinged panels, each about half the box’s width. When opened, they fold outward to become benches. That saves storage space, but the panels need solid support so they cannot collapse under a child’s weight. A simpler flat lid is cheaper and lighter, but it needs a separate place to go while the sandbox is in use.
Materials and tools
For a 4-by-4-foot box, use four 2-by-10 boards for the walls, cut to length to form a square, plus four corner blocks cut from 4-by-4 stock. Use exterior-rated screws, not drywall screws, which can snap or corrode outdoors. The lid needs two frames made from 2-by-4s and decking boards or exterior plywood. Plywood is quick to cut, but its edges need sealing and it can delaminate if water gets in. Spaced boards drain better but add more cuts.
Choose untreated, rot-resistant lumber such as cedar if it fits your budget. Untreated pine costs less, but expect a shorter service life where it contacts damp ground. Avoid wood treated with chemicals not approved for the intended use; check the label before buying. For sand, buy washed play sand rather than masonry or construction sand, which may be dusty or too coarse. A washed play sand search can help compare bag sizes and delivery options, but local bulk delivery is often cheaper for a full box.
Useful tools include a circular saw or handsaw, drill/driver, square, tape measure, and safety glasses. A box of exterior deck screws is a practical purchase if you do not already have suitable fasteners. A miter saw is convenient, not required; a circular saw and a square guide are enough for straight cuts.
Pick a beginner-friendly cover
| Cover type | Build effort | Main advantage | Trade-off |
|---|---|---|---|
| Loose flat lid | Low | Few parts and low cost | Awkward to lift and store |
| Two hinged panels | Moderate | Folds open and can form benches | Needs secure supports and careful hinge placement |
| Roll-up tarp | Very low | Lightweight and inexpensive | Can collect water and is less sturdy in wind |
For a young child, do not rely on a tarp or loose lid as a safety barrier. The cover is for keeping debris and animals out, not for supporting a person unless it is specifically built and tested for that load.
Build the box
Choose a spot with good drainage and some shade. Remove sod and roots, then level an area slightly larger than the box. A thin layer of compacted gravel helps water drain; landscape fabric under the sand can reduce weeds, though it will not prevent all weeds over time. Avoid putting fabric on top of the ground where it can become a trip edge.
Cut the wall boards so the outside dimensions are about 4 feet square. For a simple overlap, make two opposite boards 48 inches long and the other two about 45 inches long, allowing for the 1½-inch thickness of the longer boards at each end. Check the actual lumber dimensions before cutting. Stand the boards on edge, clamp the corners square, and fasten each corner into a 4-by-4 block with at least three exterior screws per board. Predrill near board ends to reduce splitting. Confirm both diagonals match; if they differ, the box is out of square.
Set the box on the prepared base and check for rocking. If it rocks, correct the base rather than pulling the frame into shape with screws. Sand sharp edges and corners. Do not add a floor: a solid bottom traps water and makes the sand harder to keep clean.
Make the hinged cover
Make two panels sized to cover the opening with a small gap between them and around the perimeter. For a 48-inch-wide box, each panel can be roughly 23½ inches wide, with the exact measurement adjusted for the hinge and frame. Build each panel as a rectangle from 2-by-4s, then screw decking boards across it or attach exterior plywood. Keep the finished panels light enough for an adult to lift comfortably; heavy panels are more likely to strain hinges or fall unexpectedly.
Attach each panel to one long side of the box with three exterior hinges spaced along the edge. Use hinges rated for outdoor use and screws long enough to bite securely into the frame, but not so long they protrude through the inside. Add a stop or support on each side so an open panel cannot fall inward or slam shut. Folding support arms or simple chains can work, but test them with the box empty and keep children clear while you adjust them. For a safer, easier lift, consider a pair of outdoor lid-support hinges; check their load rating and mounting instructions rather than assuming any hinge will hold a bench panel.
Round over or sand every edge, especially where hands will grip. Keep the gap between panels small enough that toys do not fall through, but do not create pinch points at the hinge line. If the panels become bench seats, add a crosspiece beneath each seat and verify the support bears on the box rim when open. Do not let children sit on the lid during opening or closing.
Fill and maintain
A 4-by-4-foot box with 6 inches of sand takes about 8 cubic feet, or roughly 0.3 cubic yard. Bagged sand is easier to handle in small amounts; bulk delivery usually costs less per volume. Keep the sand below the rim and replace it if it becomes contaminated with animal waste, mold, or standing water. Rake it before play and cover the box afterward.
Inspect hinges, supports, and screws at the start of each season and after storms. Tighten loose fasteners, replace rusty hardware, and look for splintering or soft wood. If water pools inside, improve drainage rather than simply adding more sand. A hinged cover earns its keep only if it opens smoothly and closes securely; if it becomes difficult to lift, repair it before letting children use the box.