
What's inside
As an Amazon Associate I earn from qualifying purchases. This post may contain affiliate links at no extra cost to you.
Fitting a wooden hinge is a useful first joinery task: it teaches you to mark accurately, cut to a line, and test the fit before removing more wood. Start with a small project that uses one or two modest hinges, softwood or clear hardwood, and a door or lid you can remove easily. A hinge that sits flush and moves freely matters more than fancy hardware.
As an Amazon Associate we earn from qualifying purchases at no extra cost to you.


Contents
What Makes a Good First Project
Choose a project with a flat, square opening and a lid or door no wider than about 12 inches. Heavy or wide panels put more leverage on the screws and make alignment harder. Avoid a large cabinet door, a chest with a heavy lid, or an outdoor gate for your first attempt.
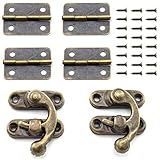
For practice, use a pair of small butt hinges on a box or a single small hinge on a light lid. Brass-plated or steel hinges are both suitable; what matters is that the hinge leaf fits the wood and the screws are long enough to hold without breaking through. A sharp marking knife, chisel, square, drill, and screwdriver are more important than a costly hinge jig. A basic bevel-edge chisel set is useful for trimming hinge recesses, but an inexpensive, sharp chisel can do the job.
Beginner Project Comparison
| Project | Hinges | Difficulty | Best lesson |
|---|---|---|---|
| Small keepsake box | Two small butt hinges | Low | Marking and fitting matching recesses |
| Wall-mounted key cabinet | Two small butt hinges | Low to moderate | Keeping a narrow door aligned |
| Tool tote lid | One or two broad hinges | Moderate | Supporting a larger, heavier panel |
The small box is the best first choice because you can clamp it securely and work on the hinge locations at a comfortable height. A key cabinet adds the challenge of fitting a door that must stay even around its opening. A tool tote is practical, but its lid can twist or sag if the box is out of square or the hinge screws are poorly placed.
Project One: Small Keepsake Box
Make a box roughly 8 inches wide, 6 inches deep, and 4 inches tall, with a separate flat lid. Keep the lid light—about 1/2 inch thick is plenty for a small box. Use two hinges spaced roughly 1 to 1 1/2 inches in from the ends. Their placement should be symmetrical, not dictated by an arbitrary measurement if the hinge leaves have different dimensions.
Set the lid in place and check that it sits evenly on the box. Mark each hinge leaf with a sharp pencil or knife, then remove the hinge and score the outline with a knife. Chisel away thin shavings inside the outline until the leaf sits flush with the wood. Take off about 1/16 inch at a time rather than trying to reach full depth in one cut. If the recess is too deep, the hinge can pull the lid out of alignment; if it is too shallow, the leaf stands proud and the lid may not close flat.
Drill pilot holes before driving screws. For small hinge screws, a pilot hole around 1/16 inch is a reasonable starting point in softwood, but check the screw’s core diameter and test on scrap. A hole that is too small can split the wood; one that is too large gives the screw little grip. If a hole lands off-center, stop rather than forcing the screw sideways. Fill and redrill only if the repair will not weaken the hinge area.
Project Two: Wall-Mounted Key Cabinet
A small cabinet with a door is a good next step because its hinges must work with a narrow, even gap. Build a box around 10 inches tall and 7 inches wide, then make the door about 1/8 inch smaller than the opening in both width and height. That clearance helps prevent seasonal wood movement or a slightly imperfect frame from making the door bind.
Clamp the door in the closed position with thin spacers at the top and sides. Lay out the hinge positions on the cabinet side and door together, then cut the recesses. Before installing screws, confirm that the cabinet is square: measure diagonally from corner to corner in both directions. If the measurements differ, the door gap will vary even if the hinge work is accurate.
This project suits small butt hinges. A pair of small butt hinges for a wood box is an affordable choice for a light door. Cheap hinges are fine for a cabinet used gently; reject any with loose pins, bent leaves, or mismatched screw holes. If the door is heavier than expected, use larger hinges rather than relying on longer screws alone.
Project Three: Tool Tote Lid
A hinged tote lid is more demanding because the panel is wider and may carry tools. Keep the lid under about 12 inches wide for a first build, and use a broad hinge or two hinges with enough leaf area to spread the load. A small decorative box hinge may look tidy but can loosen under repeated lifting.
Support the lid while marking and fitting it; letting it hang from one partly installed hinge can twist the joint or tear out a screw. Check that the lid opens without rubbing the back edge. If it binds, first check the hinge alignment and recess depth. Do not immediately plane the lid edge: removing wood can hide a hinge error and leave an uneven gap.
Tools and Common Mistakes
You can fit a hinge with a marking knife, combination square, sharp chisel, drill, and screwdriver. A small combination square helps keep hinge marks square to the edge. A drill guide is optional for a small project, and a basic hand drill works if you keep it perpendicular. Buying a specialized jig is hard to justify for one box.
The common failures are predictable: a recess too deep, a hinge leaf not square to the edge, screws driven without pilot holes, or a lid tested before the screws are snug. Install the hinge with only one screw in each leaf first. Close the lid and check the gaps; adjust while you can still shift the hinge slightly. Once it swings freely and closes flat, drill the remaining pilot holes and install the rest of the screws.
For a first build, work on scrap of the same thickness before cutting the actual recesses. One practice hinge takes only a few minutes and can prevent a visible mistake on the finished piece. If the hinge sits flush, the screw heads seat cleanly, and the panel opens without scraping, the project has taught the essential skill.